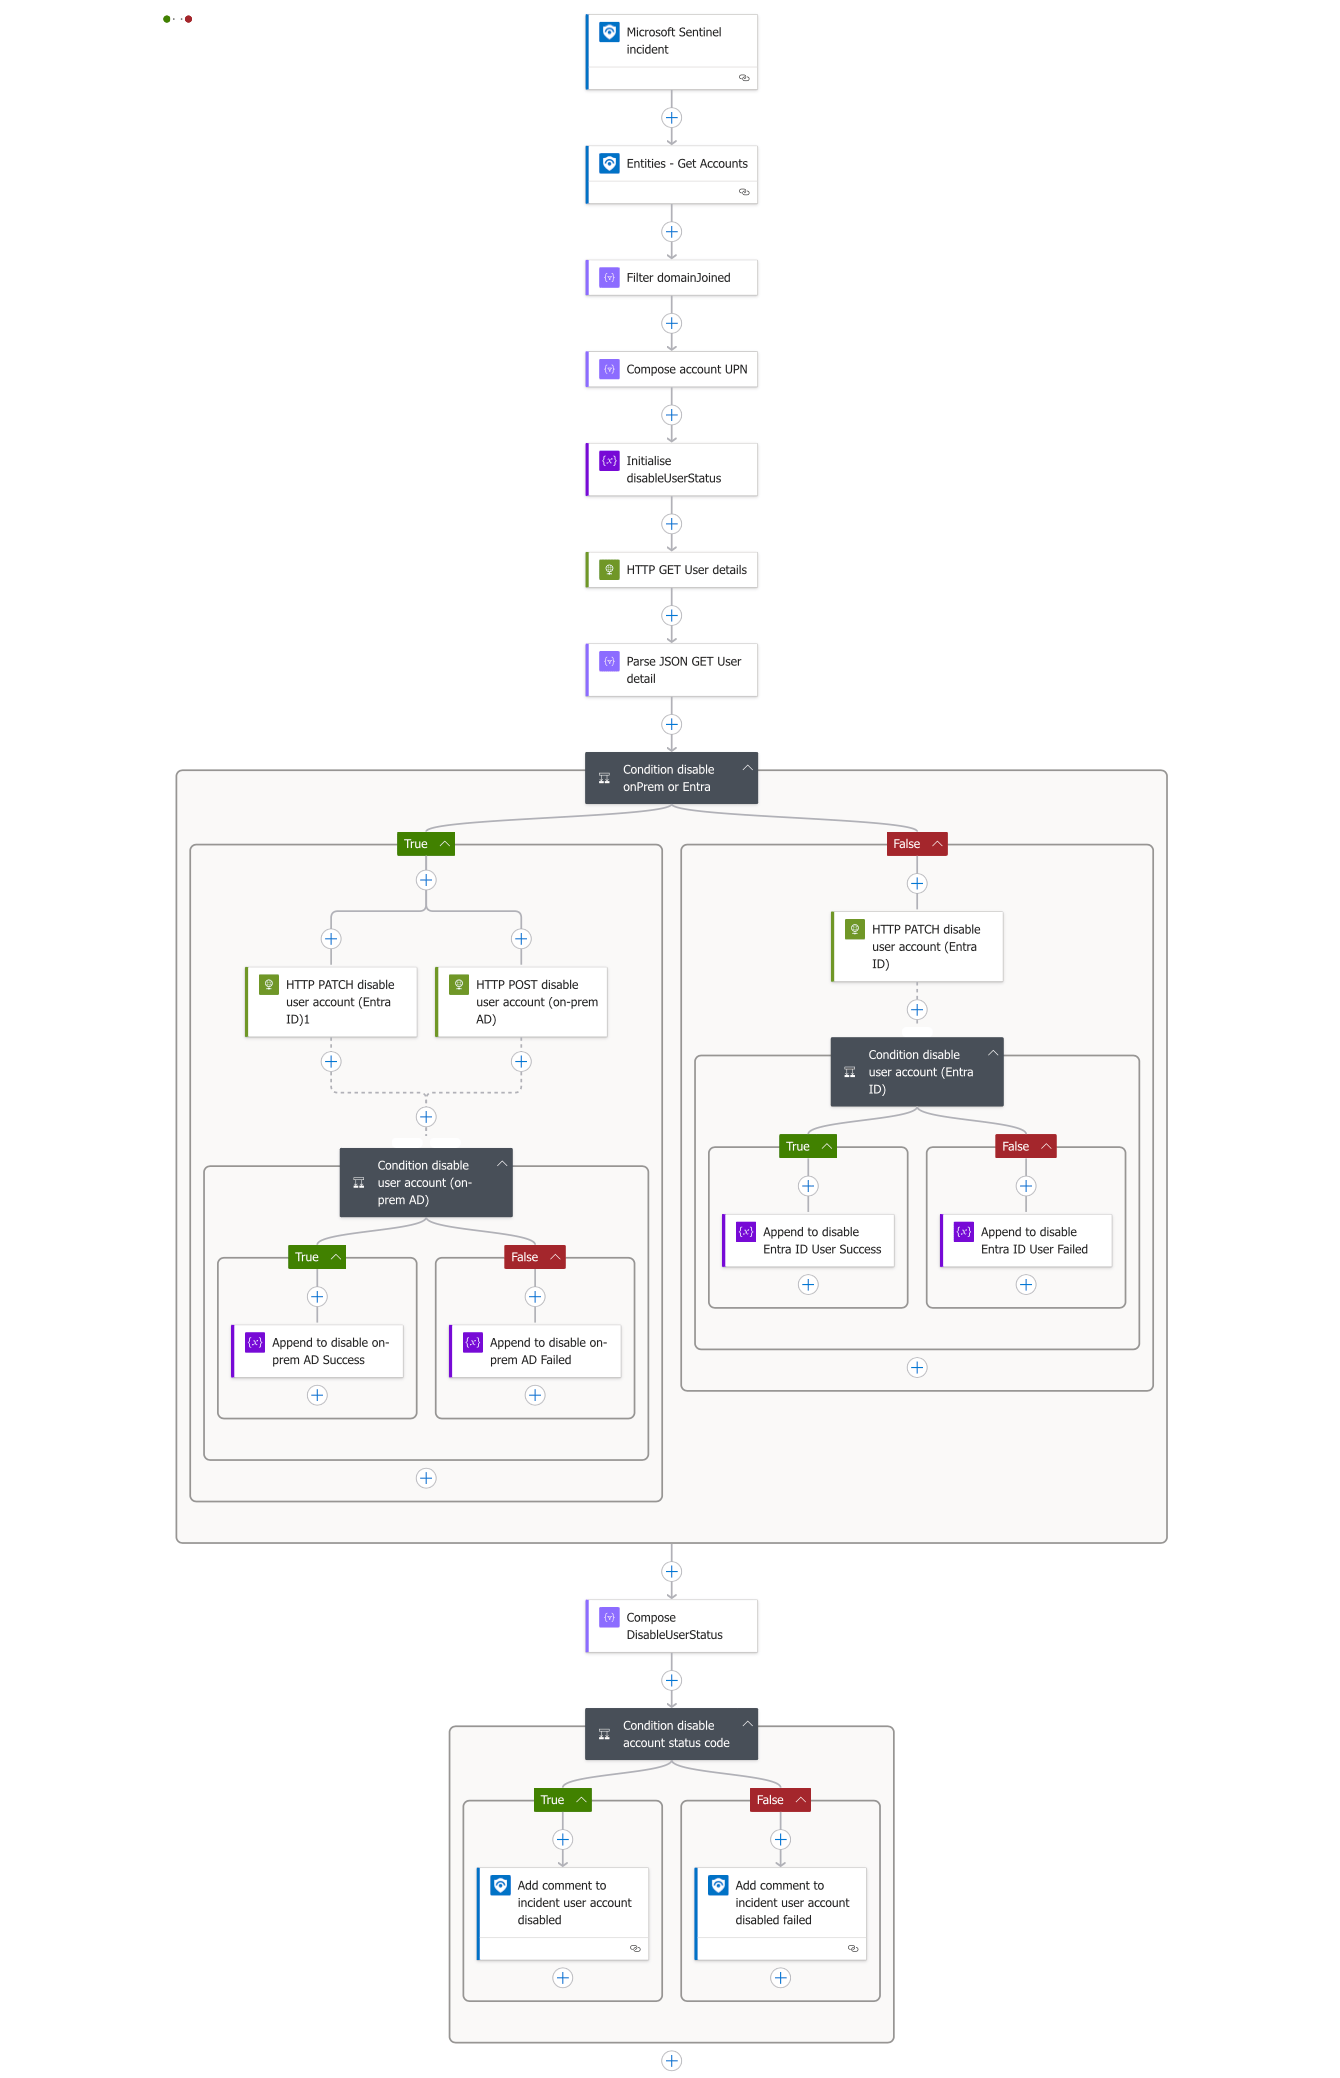
Breach Defence Automation: Creating Your Hybrid Account Kill Switch with Microsoft Sentinel and Logic Apps

In cybersecurity, response time is everything. When a suspicious user account is detected, every second counts. Today, I'm sharing a comprehensive security automation tool I've built using Logic Apps to respond to Microsoft Sentinel incidents by automatically disabling compromised accounts across both Entra ID and on-premises Active Directory environments.
This solution was inspired by Peter Klapwijk’s excellent blog post on revoking user access in emergency situations. While his approach uses a SharePoint list and manual action for initiation, this Logic App takes it a step further by leveraging Microsoft Sentinel to automatically trigger the workflow based on security incidents. This provides a fully automated, end-to-end response that aligns with modern threat detection and response strategies.
By leveraging Sentinel’s automation rules, the workflow is triggered automatically in response to security incidents—eliminating the need for manual intervention. This creates a fully automated, end-to-end response system that enables security teams to react instantly to potential compromises, even during off-hours or when they’re away from their desks.
The Challenge: Rapid Response Across Hybrid Environments
For organisations with hybrid identity environments, responding to security incidents often means juggling multiple systems. When a user account is compromised, security teams need to:
- Disable the account in Entra ID (formerly Azure AD)
- Disable the corresponding account in on-premises Active Directory
- Remove authentication methods to prevent continued access
- Document the actions taken
Doing this manually takes valuable time, especially during critical security incidents.
The Solution: Automated Account Lockdown
This Logic App workflow seamlessly bridges the cloud-on-premises divide by leveraging Microsoft's provisioning API to ensure compromised accounts are disabled everywhere they exist.
Create a Logic App with System Assigned Managed Identity
First, we need to create a Logic App with a System Assigned Managed Identity that will have permissions to read Entra ID groups and manage Sentinel watchlists.
- Navigate to Sentinel portal and create a new Logic App with an Incident trigger
- Once created, go to Identity under Settings
- Switch the Status to On under the System assigned tab
- Click Save to create the managed identity
Enable Logic App System Assigned Managed Identity
After enabling the System Assigned Managed Identity, you'll see that your Logic App now has an Object (principal) ID.
Now we need to grant the managed identity the necessary permissions to work with Microsoft Sentinel.
Assign roles directly from the Logic App
- In your Logic App's Identity page, click on Azure role assignments
- Click Add role assignment
- Configure the role assignment:
- Scope: Resource group
- Subscription: Select your subscription
- Resource group: Select the resource group containing your Sentinel workspace
- Role: Microsoft Sentinel Responder
- Click Save
How It Works: Step-by-Step
1. Incident Detection
Everything begins when Microsoft Sentinel creates a new incident involving a user account.

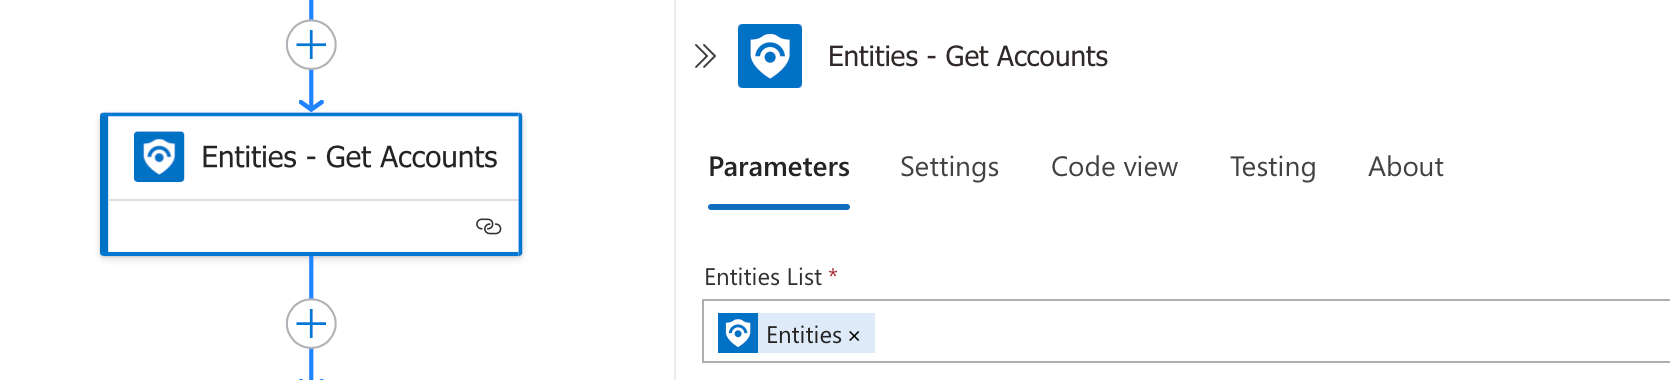
2. Extracting User Information
The workflow extracts account information from the Sentinel incident using the "Entities - Get Accounts" action. It then filters for domain-joined accounts that need to be disabled.
Step 3: Filtering for Domain-Joined Accounts
After extracting account entities from the Sentinel incident, we need to isolate the domain-joined accounts that require action. This crucial filtering step ensures we only process legitimate corporate accounts.
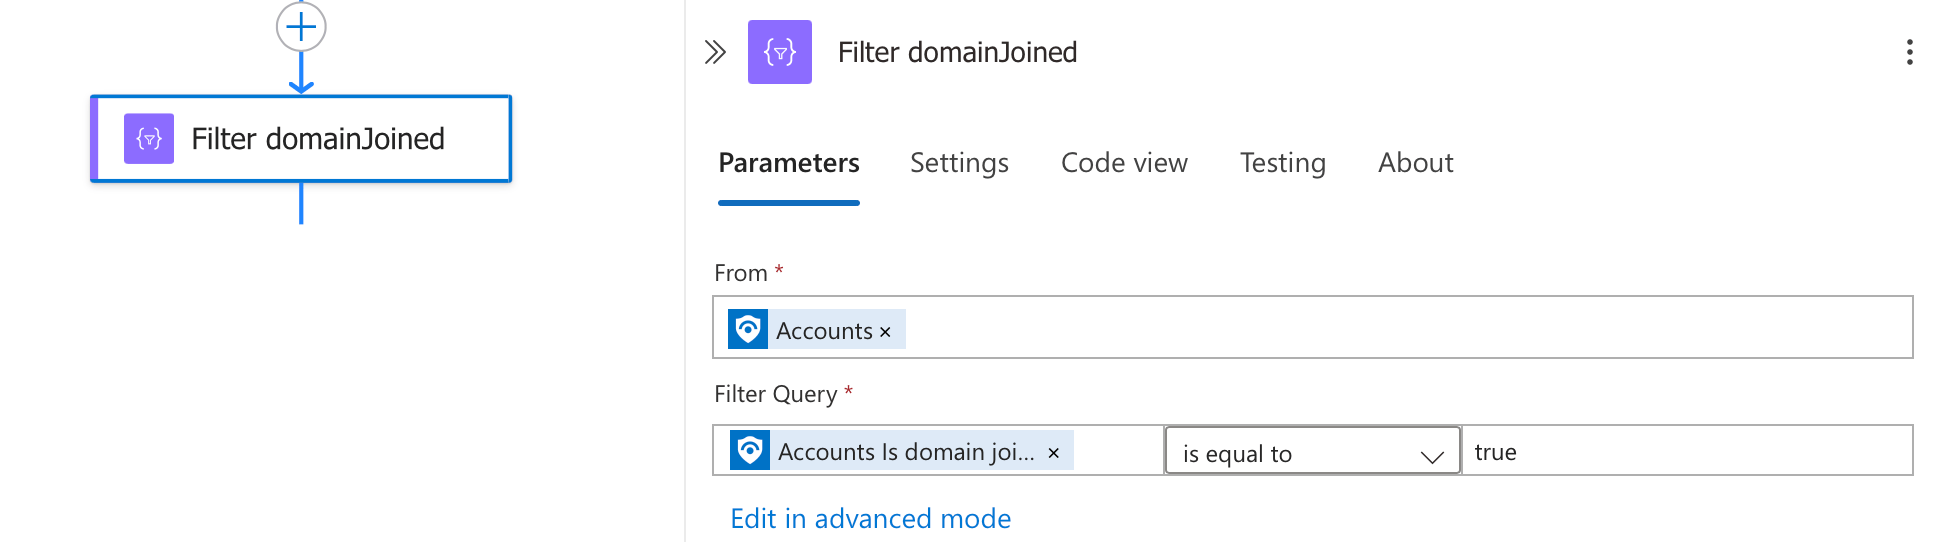
The filter works by:
- Taking the accounts extracted from the incident
- Checking the "IsDomainJoined" property of each account
- Only allowing accounts with this property set to "true" to continue through the workflow
This filtering is essential because it ensures we only take action on organisational accounts that are properly joined to your domain, avoiding potential issues with personal or external accounts that might appear in the incident data.
Step 4: Creating the User Principal Name
After filtering for domain-joined accounts, we need to construct the full User Principal Name (UPN) that will be used in our API calls. The UPN is essential for uniquely identifying the user in both Entra ID and on-premises Active Directory.
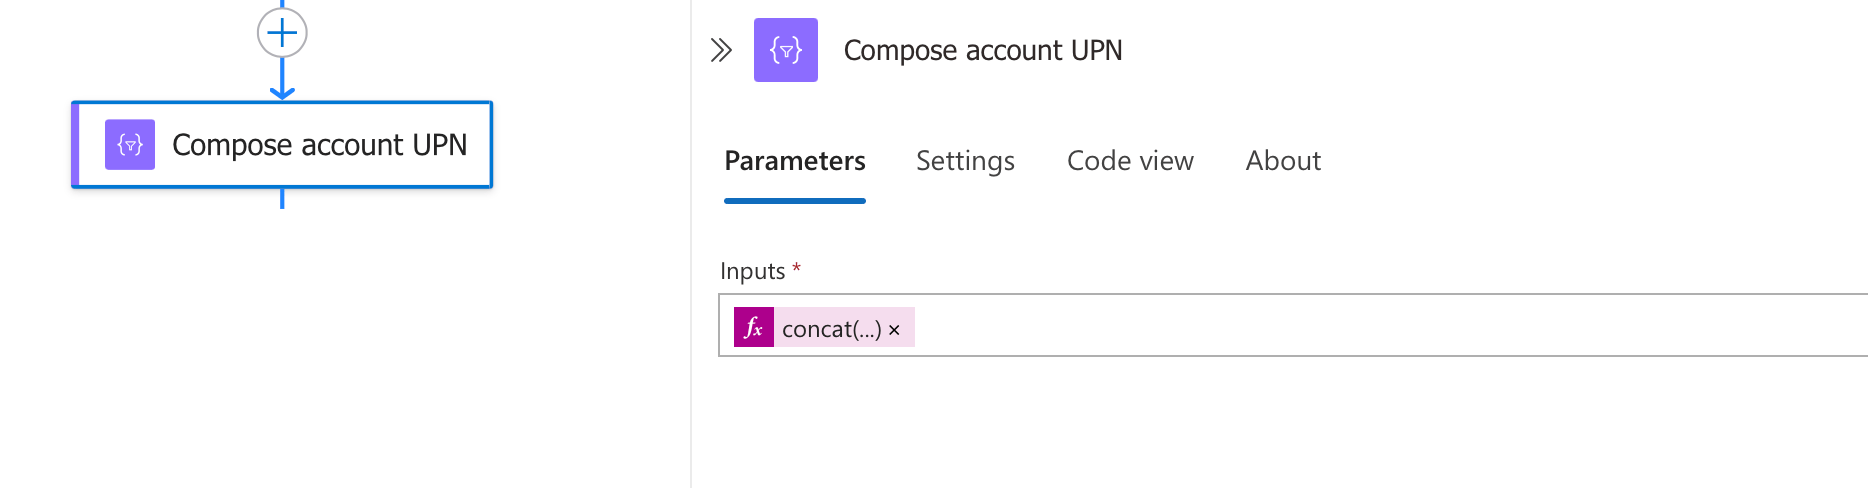
The Compose action uses this expression:
concat(first(body('Filter_domainJoined')).accountName, '@', first(body('Filter_domainJoined')).upnSuffix)This expression works by:
- Taking the first account from our filtered results
- Extracting the account name (username)
- Adding the '@' symbol
- Appending the UPN suffix (domain name)
The result is a complete UPN like "[email protected]" that uniquely identifies the user in your directory services and can be used in subsequent Graph API calls to retrieve details and perform actions on the account.
Step 5: Setting Up Status Tracking
Before performing any actions on user accounts, we need a way to track the results of our operations. This is where the status variable comes into play.
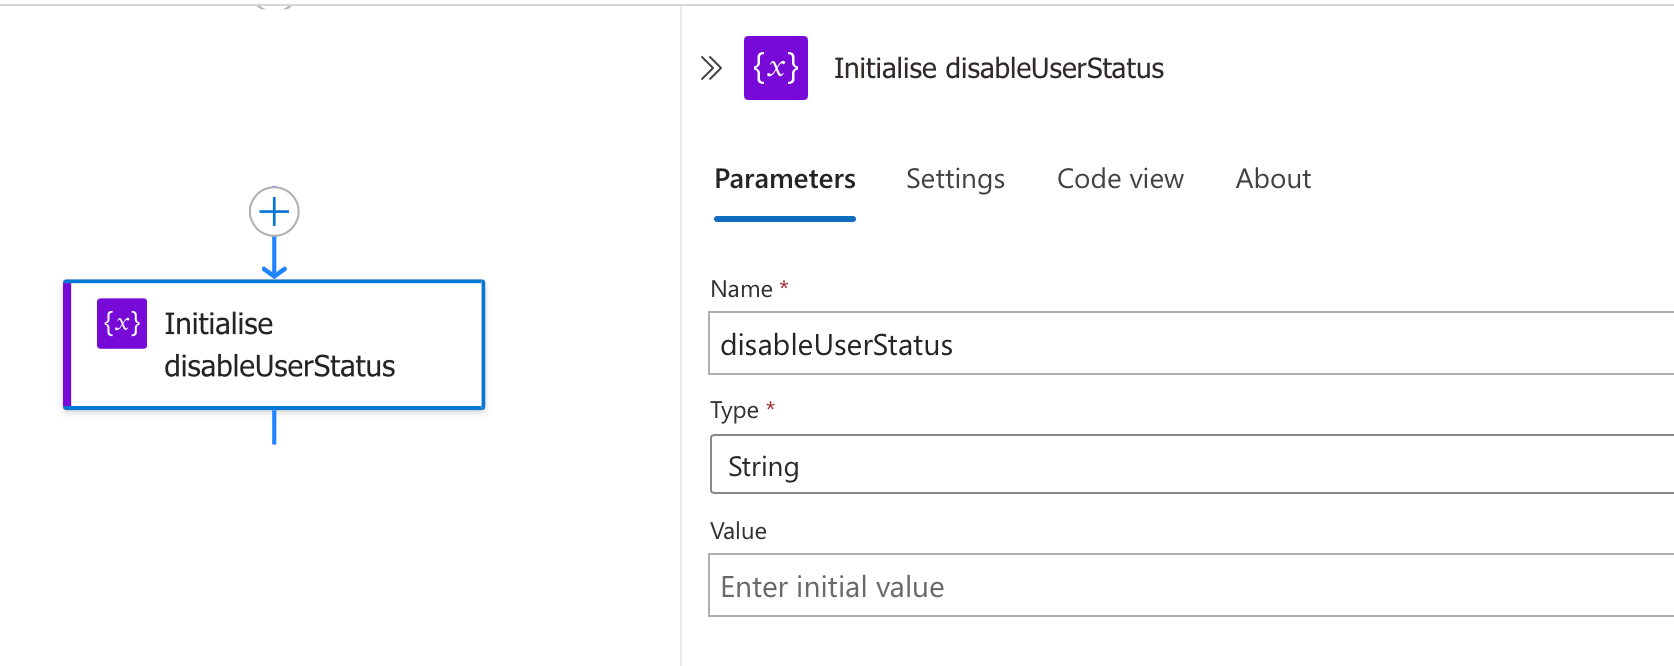
In this step, we:
- Create a new string variable called "disableUserStatus"
- Leave the initial value empty
- This variable will be used to track the success or failure of account disabling operations
This status tracking is crucial as it allows us to:
- Append success or failure messages based on the results of API calls
- Provide meaningful updates to the Sentinel incident
- Enable proper error handling and reporting
- Create a clear audit trail of actions taken
Throughout the workflow, we'll update this variable with "Success" or "Failed" values depending on the outcome of our account disabling operations in both Entra ID and on-premises AD.
Step 6: Retrieving User Details from Microsoft Graph
After constructing the user's UPN, we need to gather comprehensive information about the account to determine how to proceed with the disabling process.
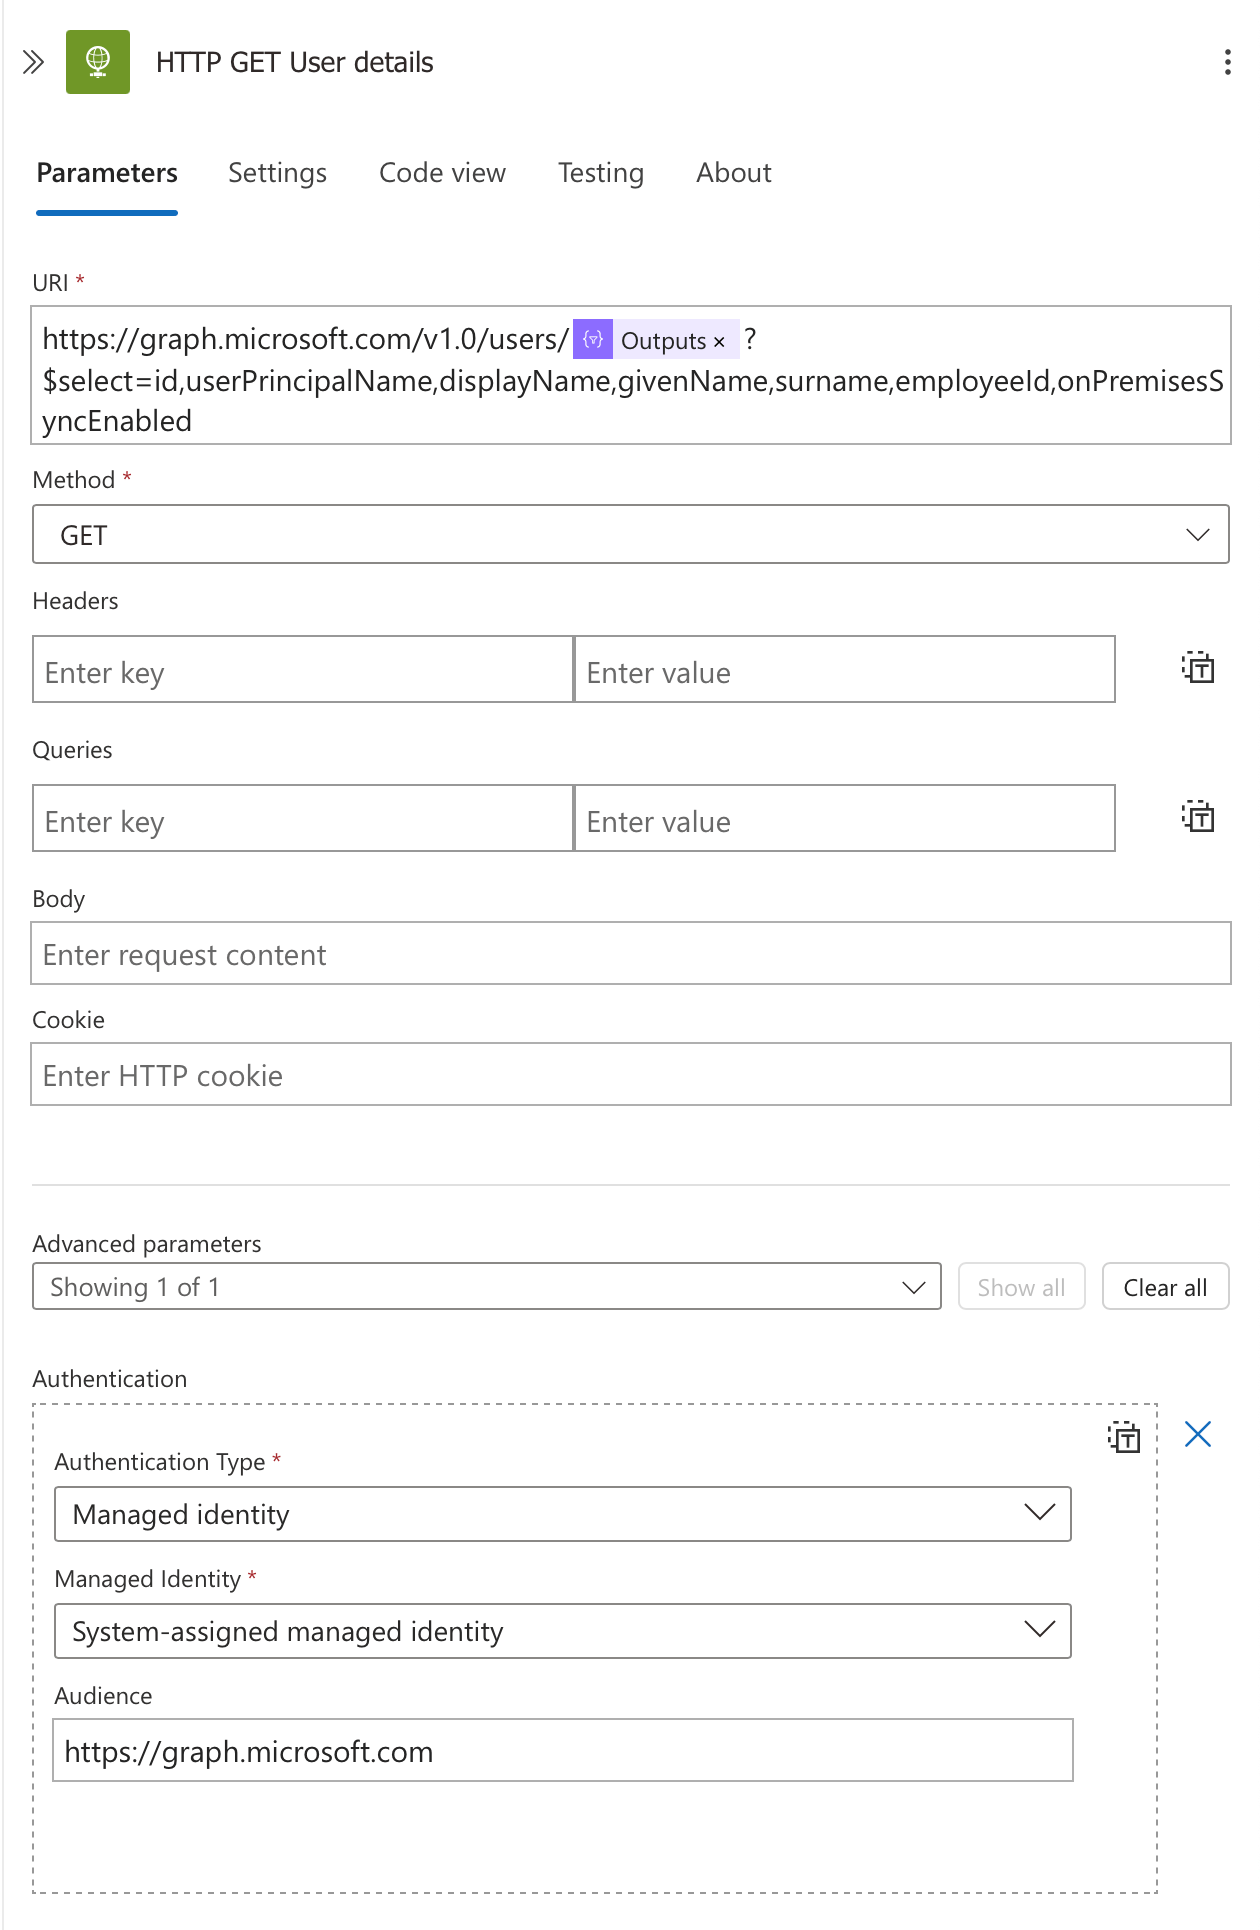
This crucial step involves making a direct call to the Microsoft Graph API to retrieve the user's key attributes:
- Method: We use the GET method to retrieve data.
- Authentication: The action uses Managed Identity authentication with:
- Authentication Type: Managed identity
- Managed Identity: System-assigned managed identity
- Audience: https://graph.microsoft.com
URI: We construct the endpoint URL with the user's UPN and select specific attributes:
https://graph.microsoft.com/v1.0/users/@{outputs('Compose_account_UPN')}?$select=id,userPrincipalName,displayName,givenName,surname,employeeId,onPremisesSyncEnabledThe most important attribute we're retrieving is onPremisesSyncEnabled, which tells us whether the account is synchronized from on-premises Active Directory. This critical piece of information will determine our branching logic in subsequent steps.
Other attributes like employeeId will be needed if we need to disable the account in on-premises AD, as this is often used as the matching attribute between systems.
Step 7: Parse the JSON output from Graph Request
Add a new action Parse JSON and name it Parse JSON GET User detail
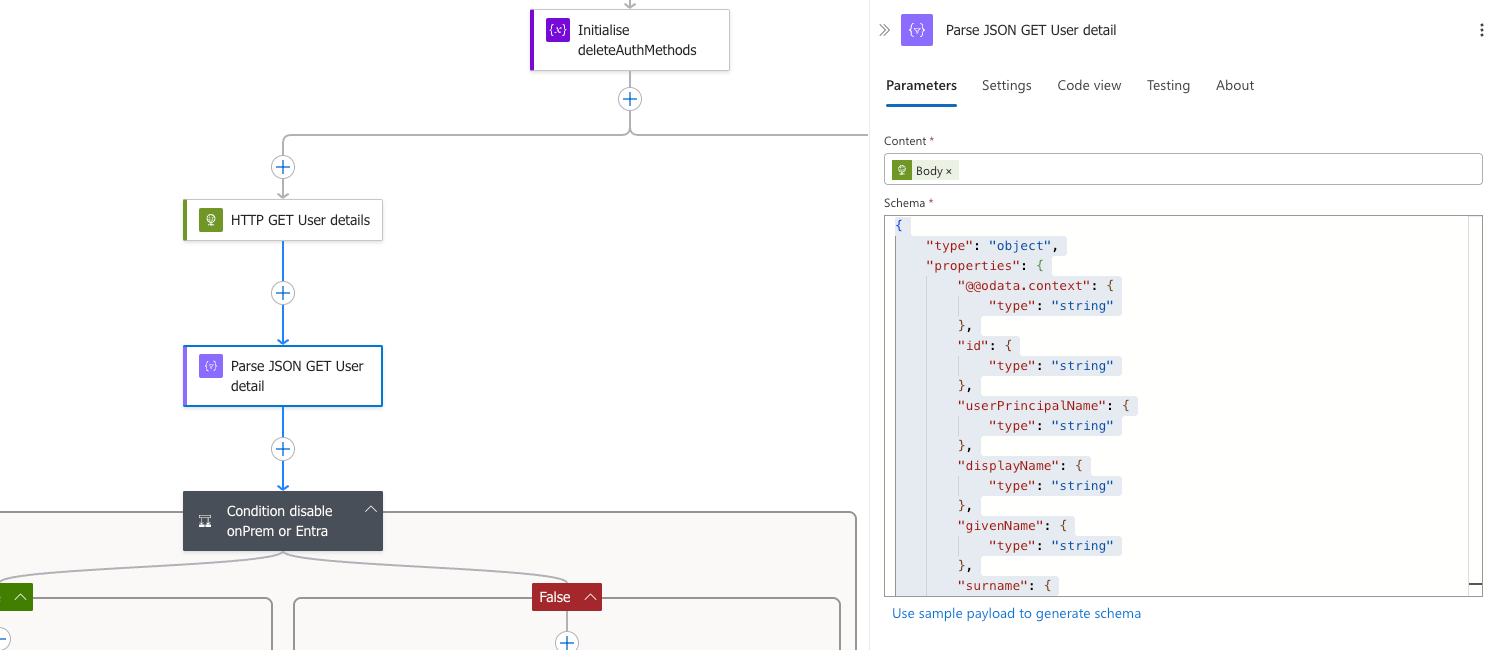
We must process the output from the preceding step, and to accomplish this we shall utilise this JSON schema. (Our thanks to the observant community member who highlighted this missing step). We will use the Body of the previous step and the schema below.
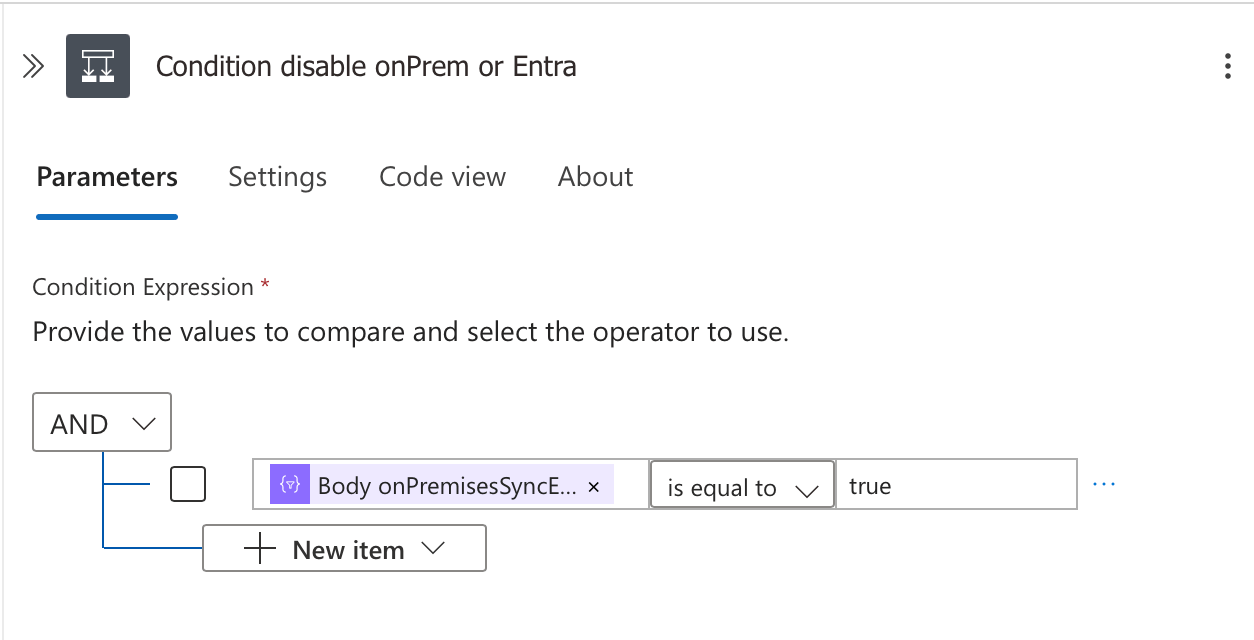
Step 8: Determining the Account Type for Disabling
Once we have the user details, we need to determine which path to take for disabling the account based on whether it's synced from on-premises Active Directory or exists only in Entra ID.

This conditional branch is the decision point in our workflow:
- If True (On-Premises Synced Account):
- The workflow will execute actions to disable the account in both Entra ID and on-premises AD
- This requires making API calls to both systems
- The on-premises disabling uses the provisioning API via SCIM protocol
- If False (Cloud-Only Account):
- The workflow will only disable the account in Entra ID
- This is a simpler process requiring just one Graph API call
Condition Expression:
@{body('Parse_JSON_GET_User_detail')?['onPremisesSyncEnabled']} is equal to trueThis branching logic ensures we take the appropriate action based on where the account is mastered, avoiding unnecessary calls while ensuring comprehensive coverage across your identity infrastructure.
Step 9: Simultaneous Disabling of Accounts in Hybrid Environments
When dealing with accounts that are synced from on-premises Active Directory, it's critical to disable the account in both environments. Our Logic App handles this with parallel processing for maximum efficiency.
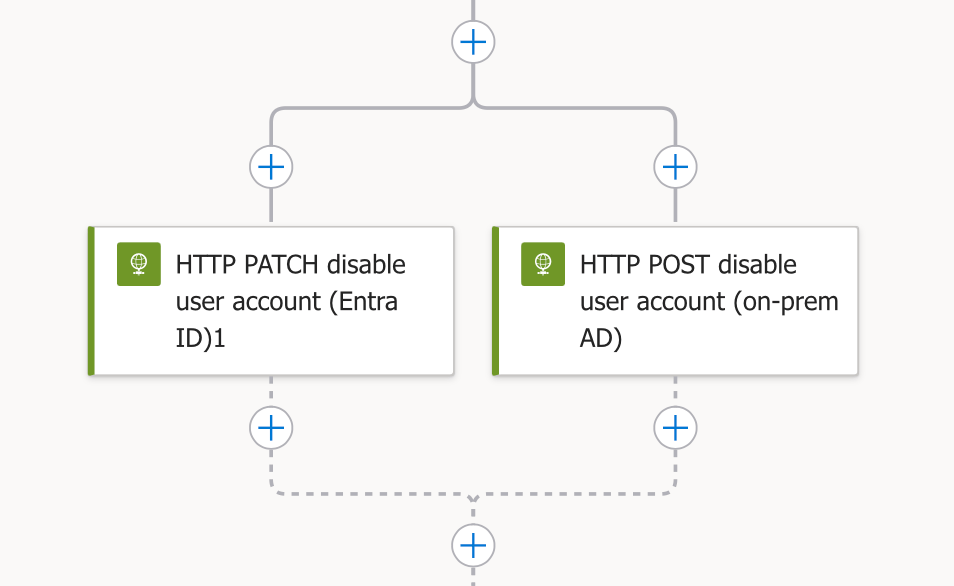
Creating the Parallel Branch Structure
As shown in Image, after the workflow determines the account is synced from on-premises, we create two parallel branches:
- Left branch: Handles disabling the account in Entra ID
- Right branch: Handles disabling the account in on-premises Active Directory
How to create this parallel structure:
- In the "If true" section of your conditional branch, add multiple actions
- Logic Apps automatically arranges them in parallel when they don't have dependencies on each other
- This parallel execution ensures both systems are updated simultaneously
Left Branch: Disabling in Entra ID
The left branch makes a PATCH request to Microsoft Graph API:
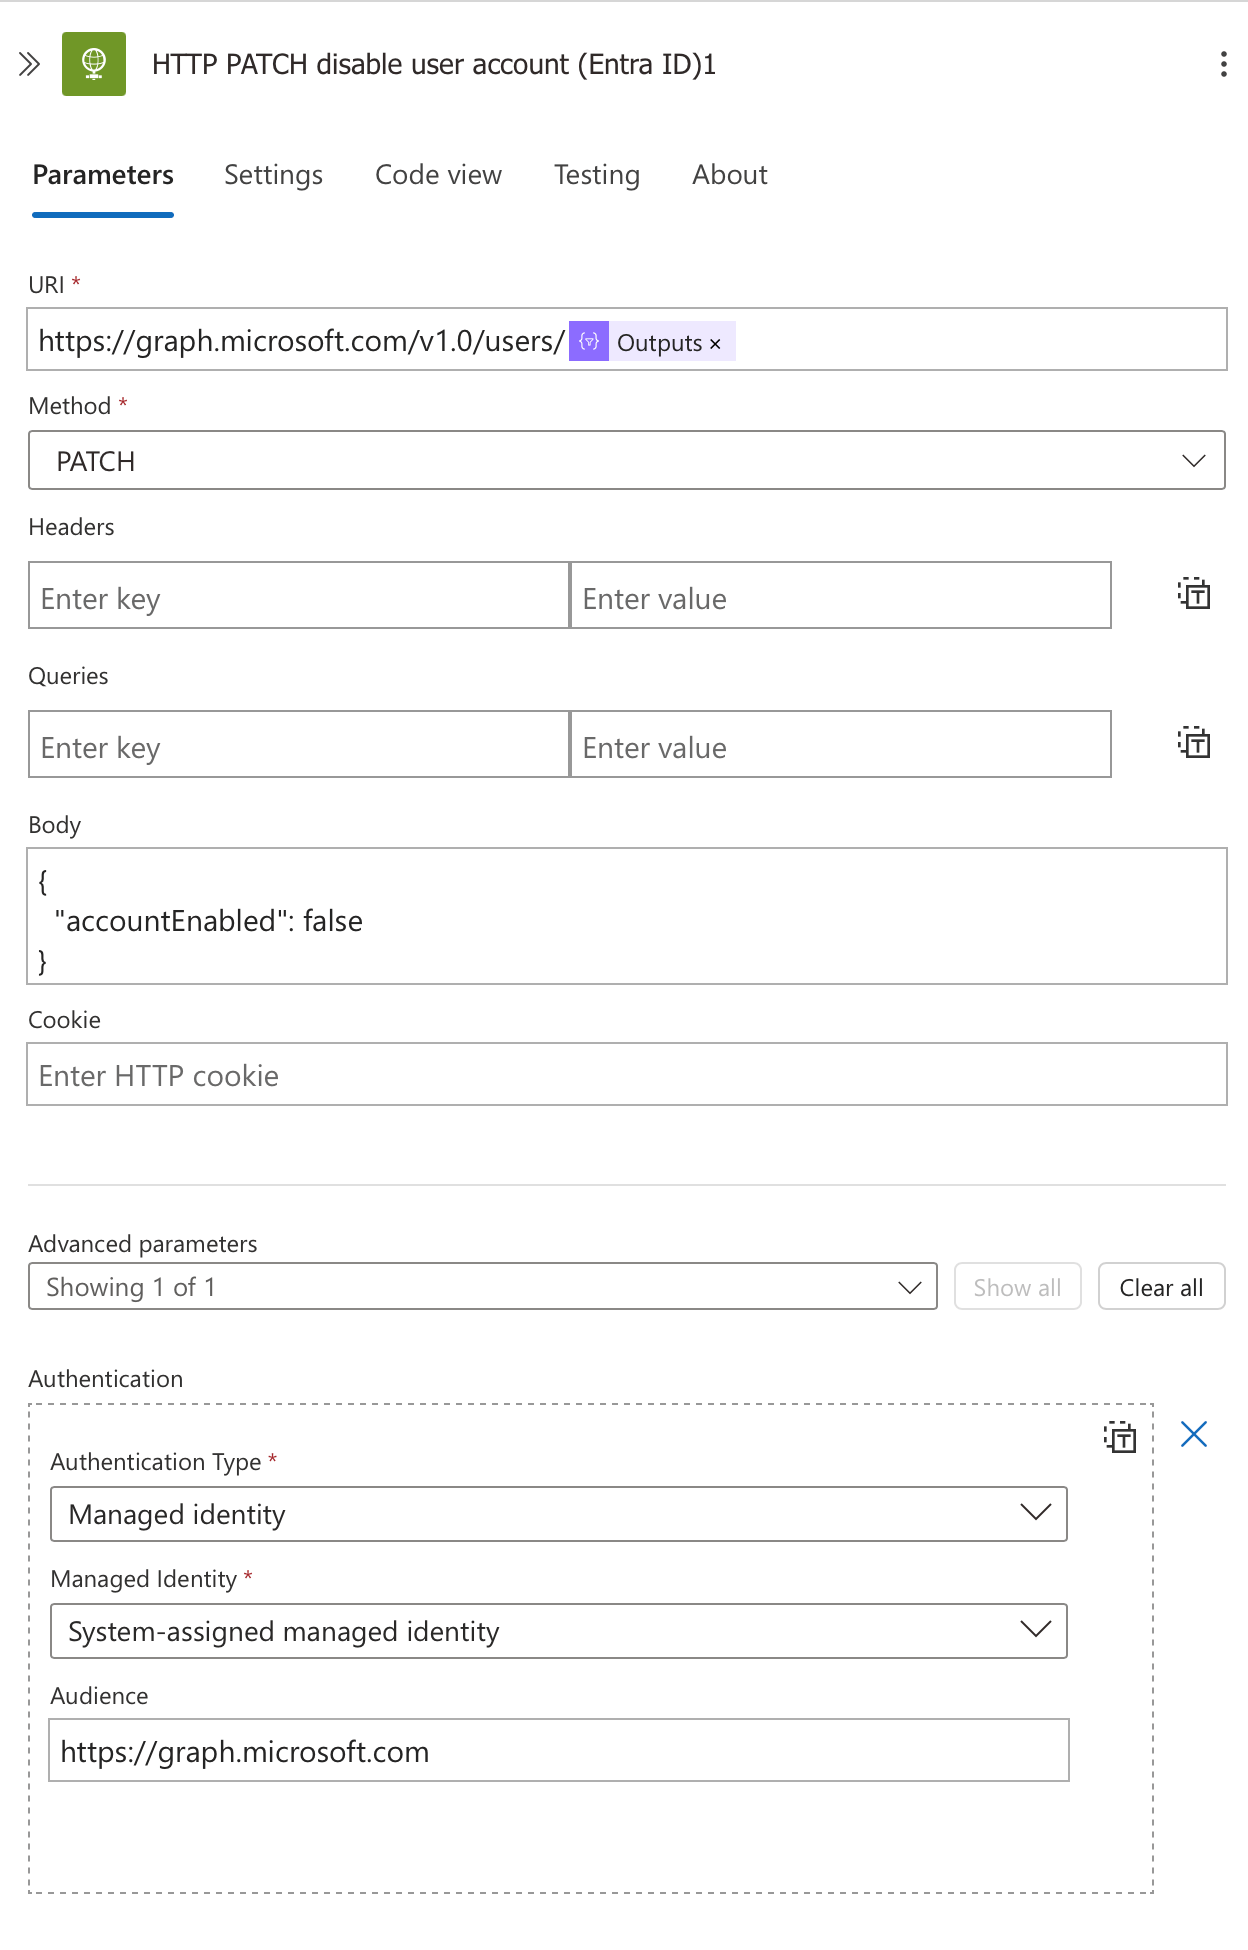
This action makes a direct call to the Microsoft Graph API to disable the user account:
URI:
https://graph.microsoft.com/v1.0/users/@{outputs('Compose_account_UPN')}Method: PATCH
- This allows us to update specific properties without changing the entire user object.
- This simple JSON payload sets the account status to disabled.
Body:json
This targets the specific user by their UPN that we constructed earlier.
Authentication:
- Type: Managed identity
- Identity: System-assigned managed identity
- Audience: https://graph.microsoft.com
Right Branch: Disabling in On-Premises AD
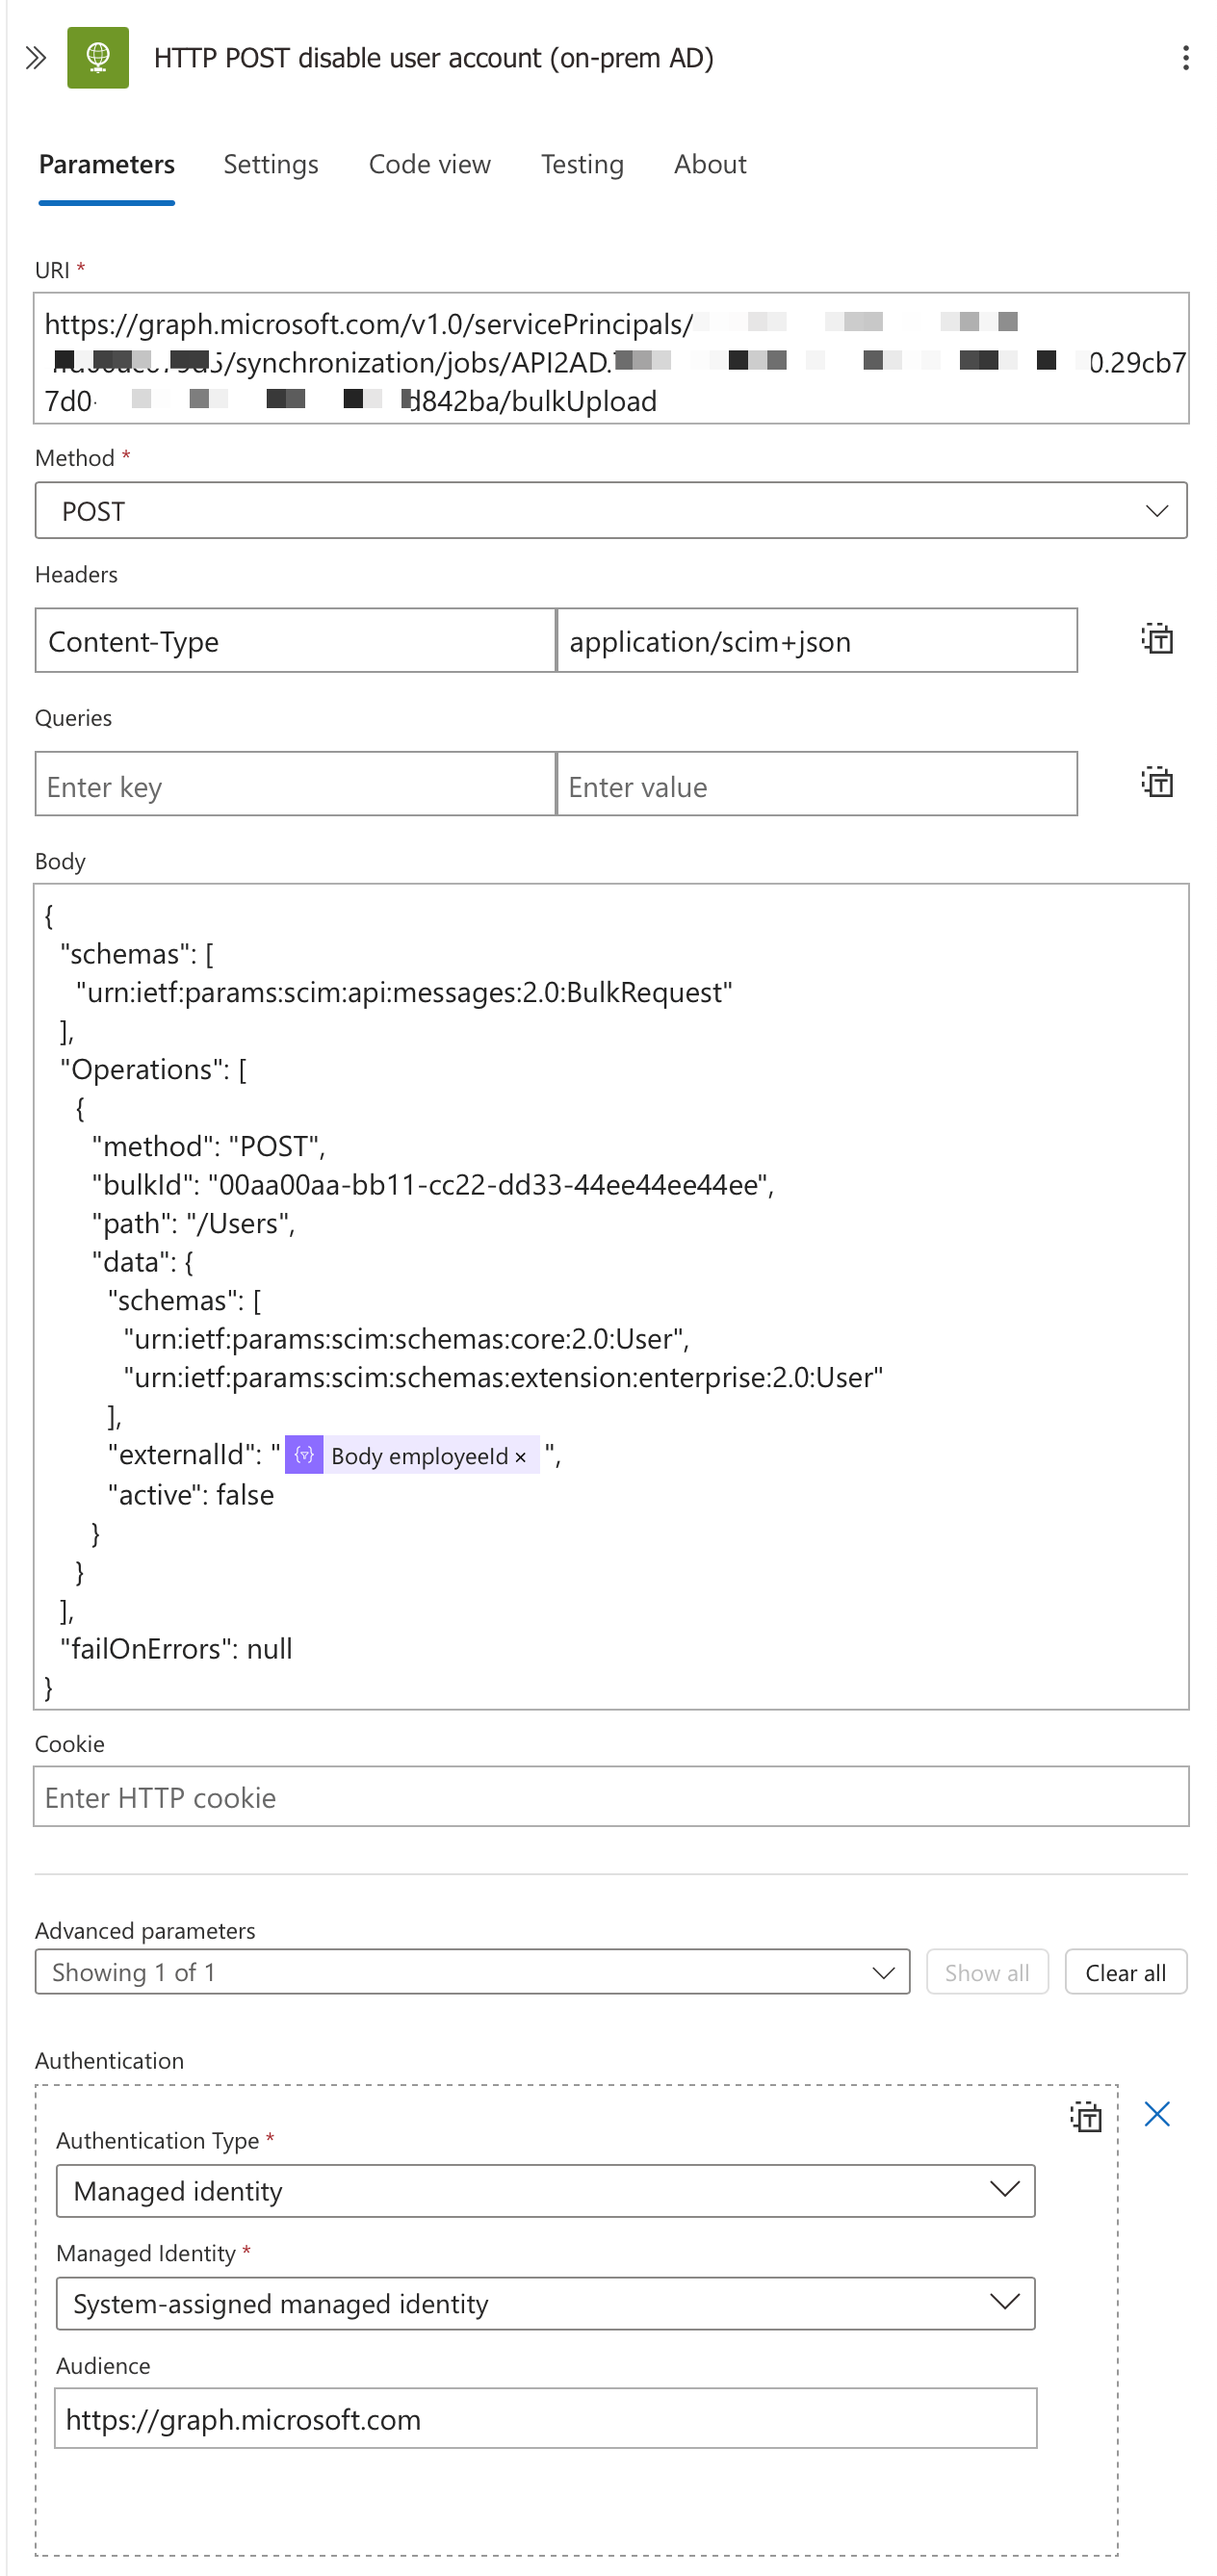
This action leverages the Microsoft Graph API's provisioning capabilities to disable the user account in on-premises Active Directory:
URI:
https://graph.microsoft.com/v1.0/servicePrincipals/{PrincipalId}/synchronization/jobs/{JobId}/bulkUploadThis endpoint connects to your on-premises provisioning service principal and synchronisation job.
At the end of this blog you will configure API-driven inbound provisioning to on-premises AD enterprise application, once this has been configured it will give you an endpoint, you this endpoint in the URL field
Method: POST
- We're sending an operation to be processed by the on-premises provisioning agent.
Headers:
Content-Type: application/scim+json- Specifies we're using the SCIM protocol format for identity management.
Body: json
- This SCIM-formatted payload identifies the user via employeeId and sets "active" to false.
Authentication:
- Type: Managed identity
- Identity: System-assigned managed identity
- Audience: https://graph.microsoft.com
This parallel approach significantly reduces response time compared to sequential execution and ensures comprehensive coverage across your hybrid identity environment.
Step 10: Checking Disable Operation Results
After attempting to disable the user account in both Entra ID and on-premises AD, we need to verify that these operations completed successfully.
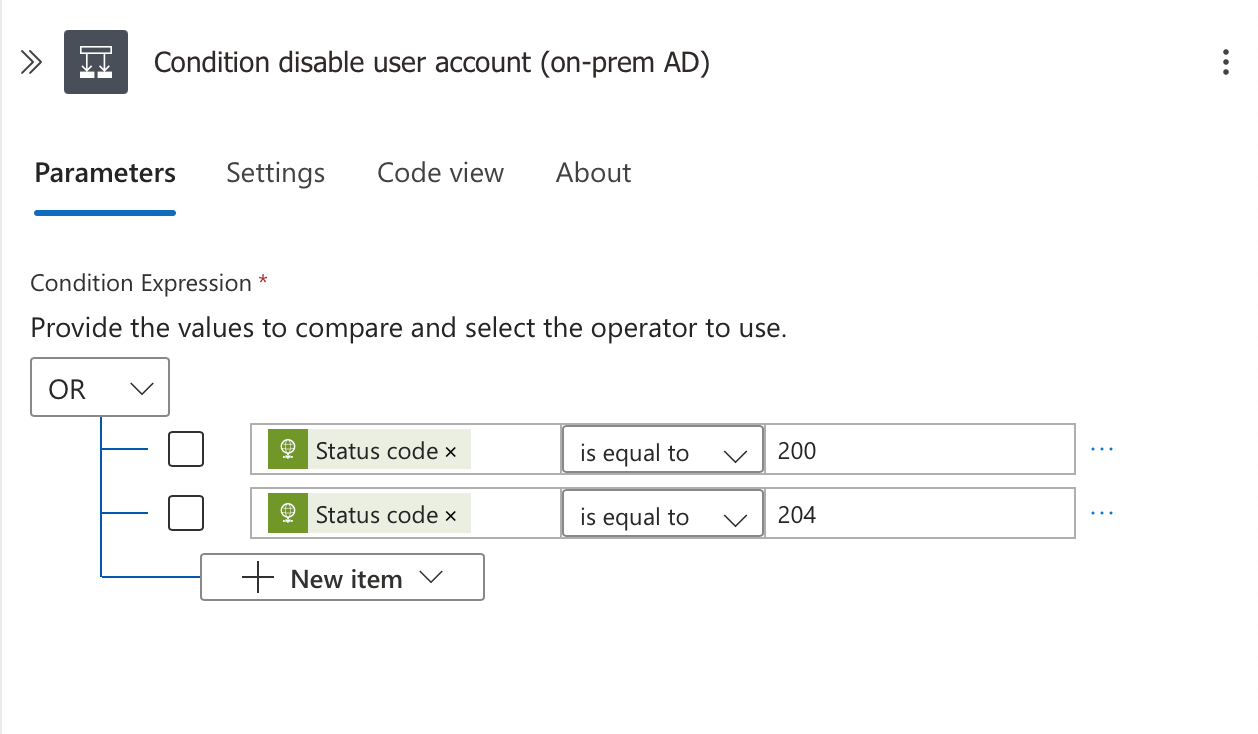
This condition serves as a critical checkpoint in our workflow:
- Status Code References:
- On-premises operation status:
@outputs('HTTP_POST_disable_user_account_(on-prem_AD)')?['statusCode'] - Entra ID operation status:
@outputs('HTTP_PATCH_disable_user_account_(Entra_ID)1')?['statusCode']
- On-premises operation status:
- Success Criteria:
- The on-premises AD operation returns status code 200 when successful
- The Entra ID operation returns status code 204 (No Content) when successful
- If either operation succeeds, we consider the overall disable action to be successful
Condition Expression: Uses an OR operator to check for successful status codes:
This verification step is crucial because it:
- Ensures we accurately track the results of our security actions
- Allows for proper incident documentation
- Enables additional remediation steps if the disabling operations fail
- Provides accountability and audit trail for security operations
The OR logic is particularly important because it recognises that even partial success (disabling in one system but not the other) still provides some security benefit during an incident.
Step 11: Tracking Operation Status
After evaluating whether our disable operations succeeded, we need to record the outcome for reporting and documentation purposes.
The workflow uses string variable operations to track the status:
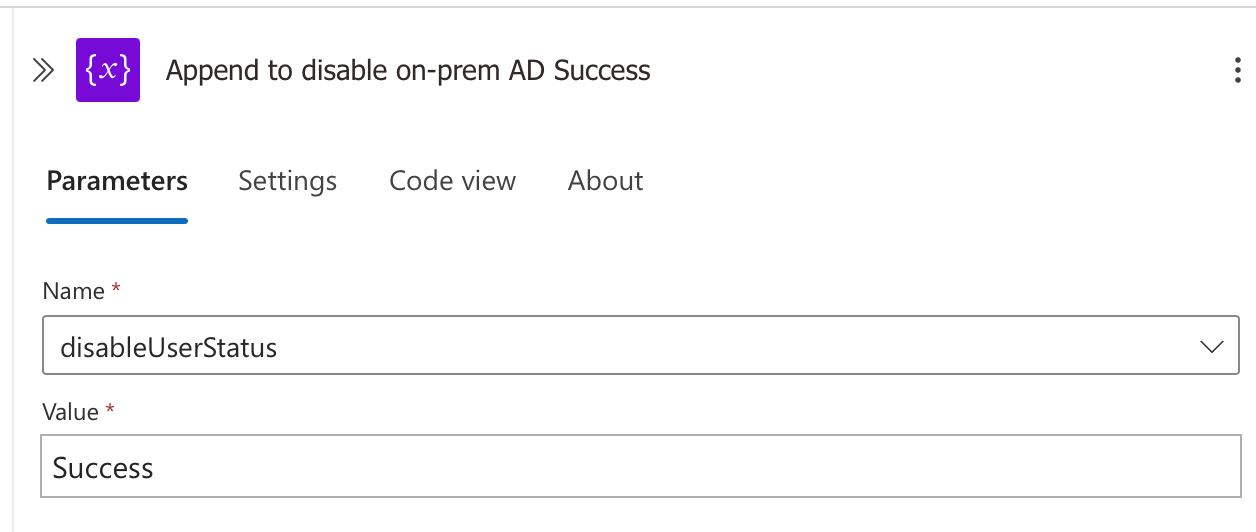
- Success Branch: When the account disabling operations succeed (either in Entra ID, on-premises AD, or both), the workflow:
- Uses the "AppendToStringVariable" action
- Targets the "disableUserStatus" variable we created earlier
- Appends the value "Success" to the variable
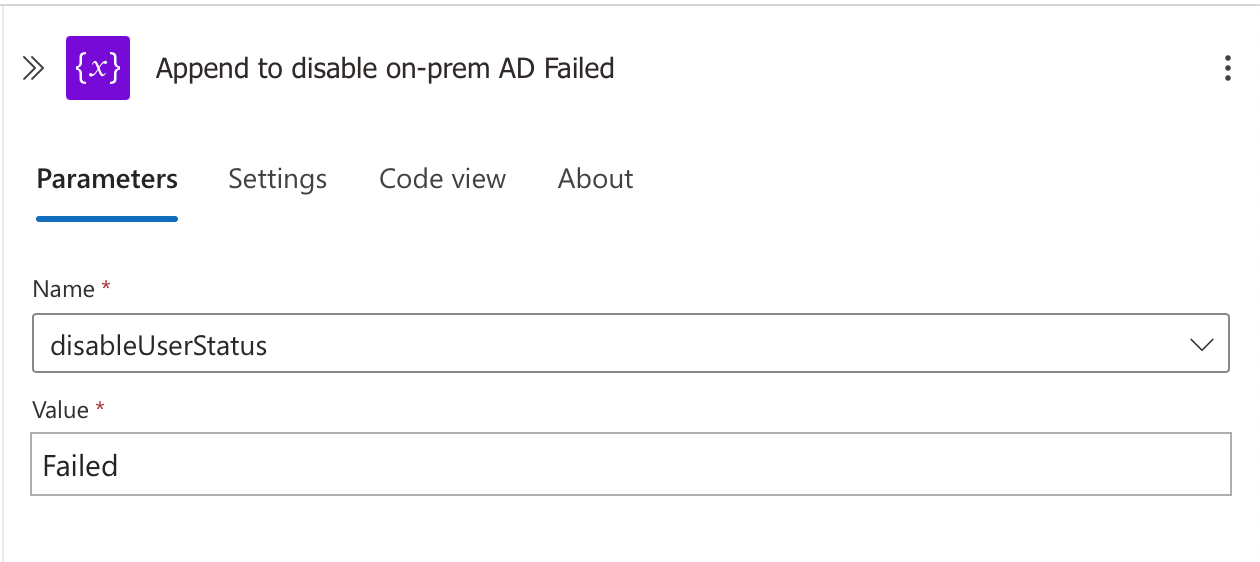
- Failure Branch: When both account disabling operations fail, the workflow:
- Uses a similar "AppendToStringVariable" action
- Targets the same "disableUserStatus" variable
- Appends the value "Failed" to the variable
This status tracking approach has several advantages:
- Provides clear, consistent status reporting for downstream actions
- Creates a single variable that summarizes the outcome of multiple operations
- Enables conditional branching for different notification or remediation paths
- Supports meaningful incident updates in Microsoft Sentinel
The variable will be used in subsequent steps to update the Sentinel incident with appropriate comments about the actions taken and their results.
Step 12: Handling Cloud-Only Accounts
Our workflow also handles accounts that exist only in Entra ID (not synced from on-premises). This branch executes when our initial condition detects that onPremisesSyncEnabled is false.
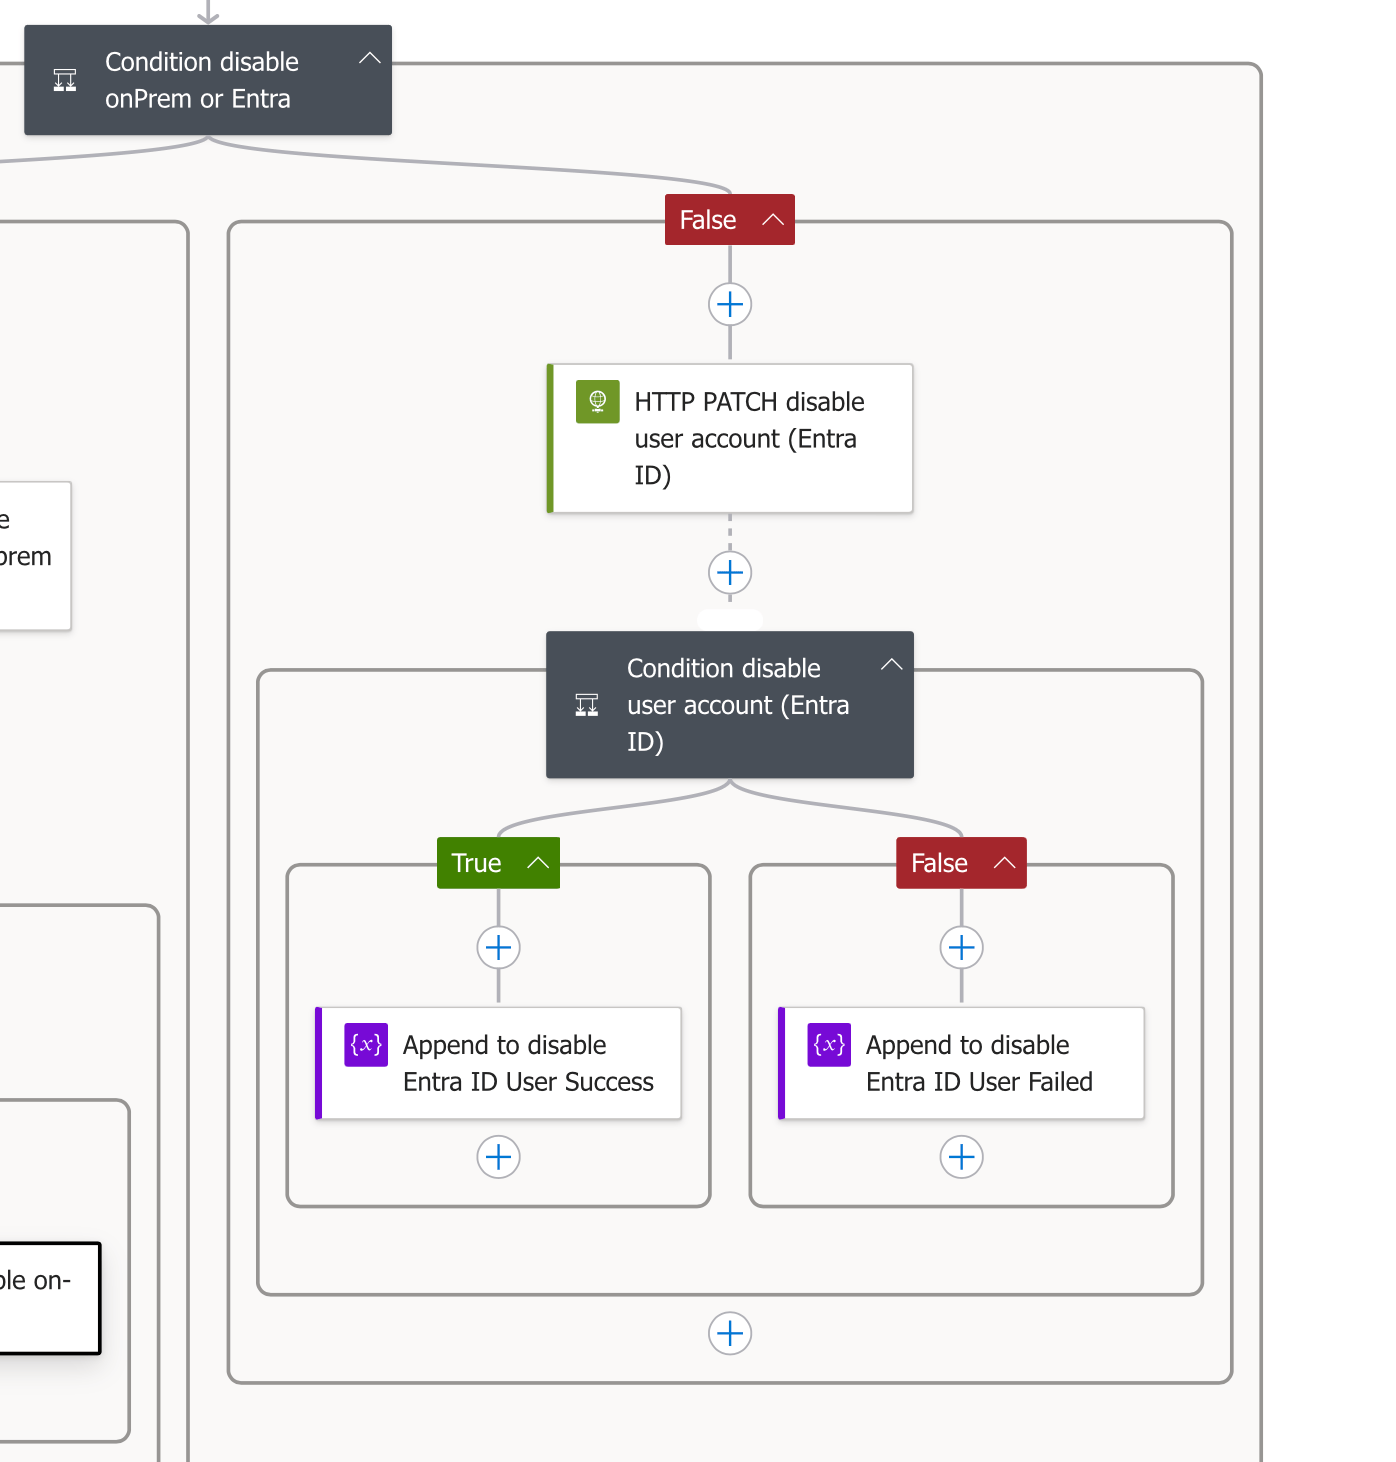
For cloud-only accounts, the process is streamlined compared to hybrid accounts:
- Single Disable Operation:
- Only needs to execute the "HTTP PATCH disable user account (Entra ID)" action
- Uses the same Graph API endpoint we described earlier
- Sets "accountEnabled": false in the JSON payload
- Status Code Verification:
- Uses a separate condition to check if the status code equals 204
- The condition branches to appropriate success/failure variable updates
- Status Tracking:
- Uses the same variable approach to record "Success" or "Failed"
- Maintains consistent reporting across both branches of the workflow
Reusing Knowledge: If you're implementing this Logic App yourself, you can reuse the same approach we covered in Steps 8-10, with these key differences:
- You only need the Entra ID PATCH request (no on-premises action)
- The success condition only checks for status code 204
- The variable updates should use appropriate messages for cloud-only accounts
This design ensures consistent handling regardless of where the user account is mastered, while optimising the process for cloud-only scenarios by eliminating unnecessary API calls to on-premises systems.
Step 13: Finalising and Documenting the Incident
After all account disabling operations are complete, our workflow performs a final check on the results and updates the Microsoft Sentinel incident with appropriate documentation.
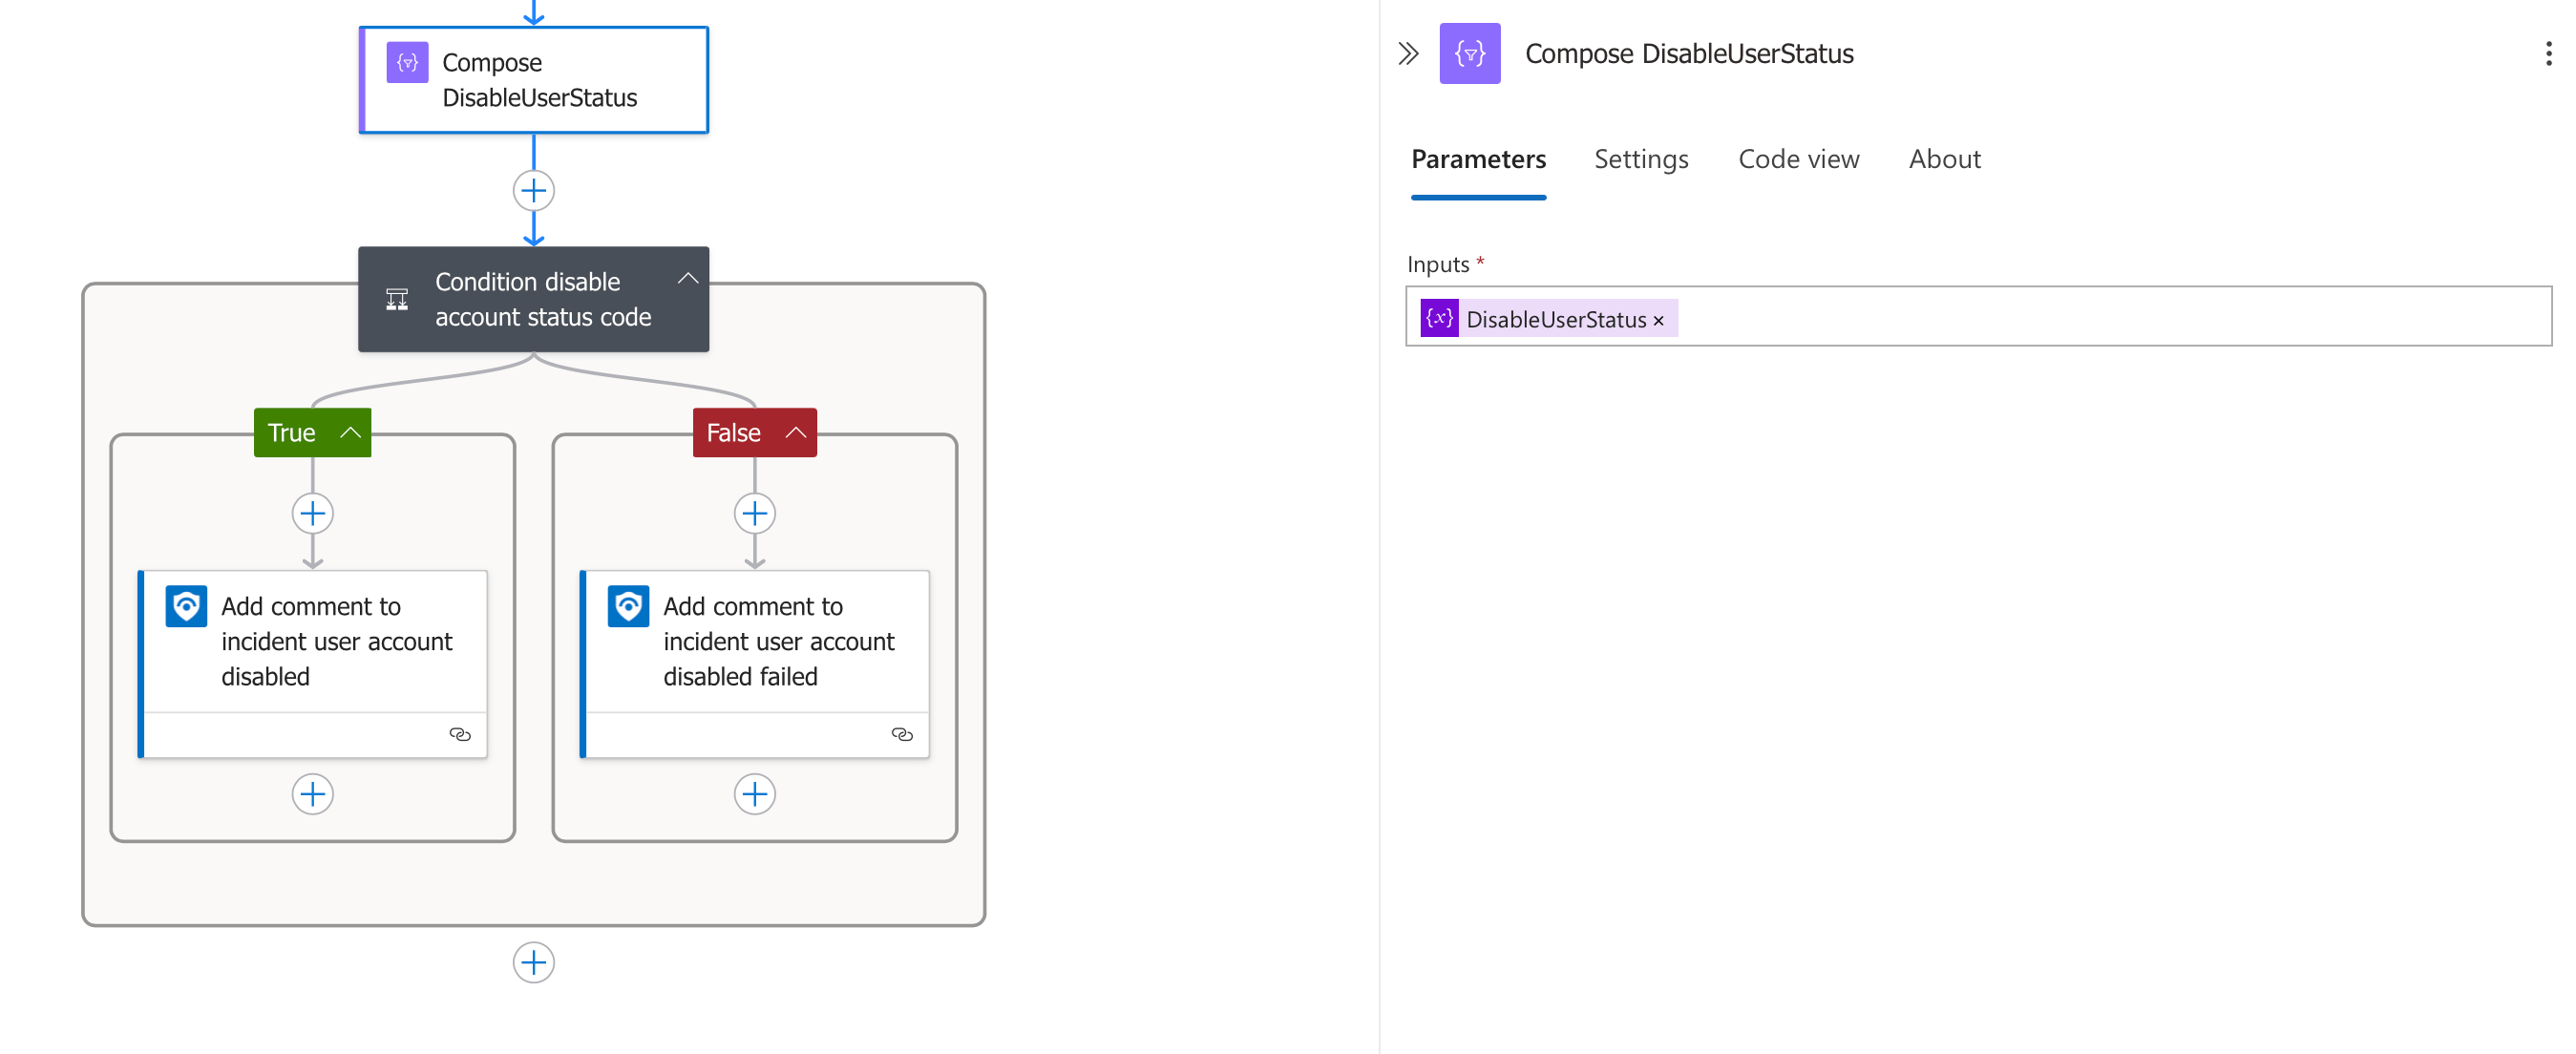
Composing the Final Status
First, the workflow collects all the status information using a Compose action:
- Compose DisableUserStatus:
- Takes the disableUserStatus variable as input
- This variable now contains either "Success" or "Failed" based on our previous operations
- This composition makes the status available for the final condition check
Evaluating the Final Status
Next, the workflow uses a condition to determine the appropriate incident update:
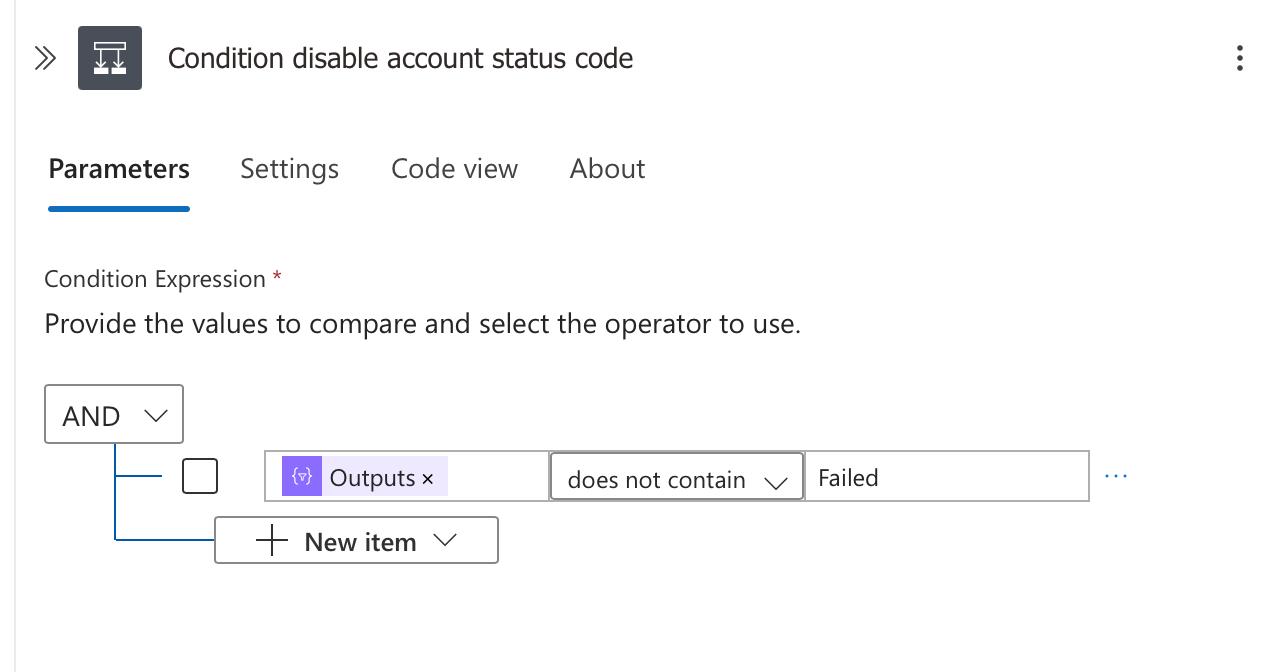
This checks if the status contains "Failed" and branches accordingly.
@outputs('Compose_DisableUserStatus')Updating the Sentinel Incident
Based on the final status, the workflow adds an appropriate comment to the Microsoft Sentinel incident:
- Success Path:
- Executes "Add comment to incident user account disabled"
- Adds a comment confirming the account was successfully disabled
- Failure Path:
- Executes "Add comment to incident user account disabled failed"
- Adds a comment noting that the account disabling operation failed
- This provides clear visibility to security analysts that manual intervention may be required
This final documentation step is crucial because it:
- Creates a clear audit trail within the incident
- Informs security analysts of the automated actions taken
- Ensures proper follow-up for any failed operations
- Completes the incident response lifecycle for the automated portion
With this comprehensive approach, our Logic App provides end-to-end automation of the account disabling process, from incident detection to final documentation, across both cloud and on-premises environments.
Step 14: Assigning Required Permissions to the Logic App's Managed Identity
For our Logic App to successfully execute all the actions we've configured, its Managed Identity needs appropriate permissions in Microsoft Graph and Entra ID.
Understanding the Permission Requirements
The script handles two types of required permissions:
- Microsoft Graph API Permissions:
- User.ManageIdentities.All - Required for identity management
- SynchronizationData-User.Upload - Required for on-premises provisioning actions
- AuditLog.Read.All - Required to access incident details
- Entra ID Directory Role:
- User Administrator - Provides necessary rights to manage user accounts
Running the Script
To use this script:
- Save it as
AssignLogicAppPermissions.ps1 - Update the
$miObjectIdvariable with your Logic App's Managed Identity Object ID - Run the script in PowerShell with administrator privileges
- Connect with an account that has Global Administrator or Privileged Role Administrator permissions
The script performs several key tasks:
- Connects to Microsoft Graph with appropriate scopes
- Identifies the required app roles from the Microsoft Graph service principal
- Checks for and assigns any missing permissions
- Activates the User Administrator role if needed
- Assigns the role to your Logic App's Managed Identity
Script Highlights
powershell
# Define all permissions to assign
$permissionsToAssign = @(
    "UserAuthenticationMethod.ReadWrite.All",
    "SynchronizationData-User.Upload",
    "AuditLog.Read.All"
)

# Assign Entra ID role
$roleName = "User Administrator"


This script makes the permission assignment process much easier and ensures your Logic App has all the permissions it needs to function properly across both cloud and on-premises environments.
Setting Up API-Driven Provisioning to On-Premises Active Directory
Before our Logic App can disable user accounts in on-premises Active Directory, we need to configure the API-driven provisioning integration. This creates the bridge between Microsoft Entra ID and your on-premises environment.

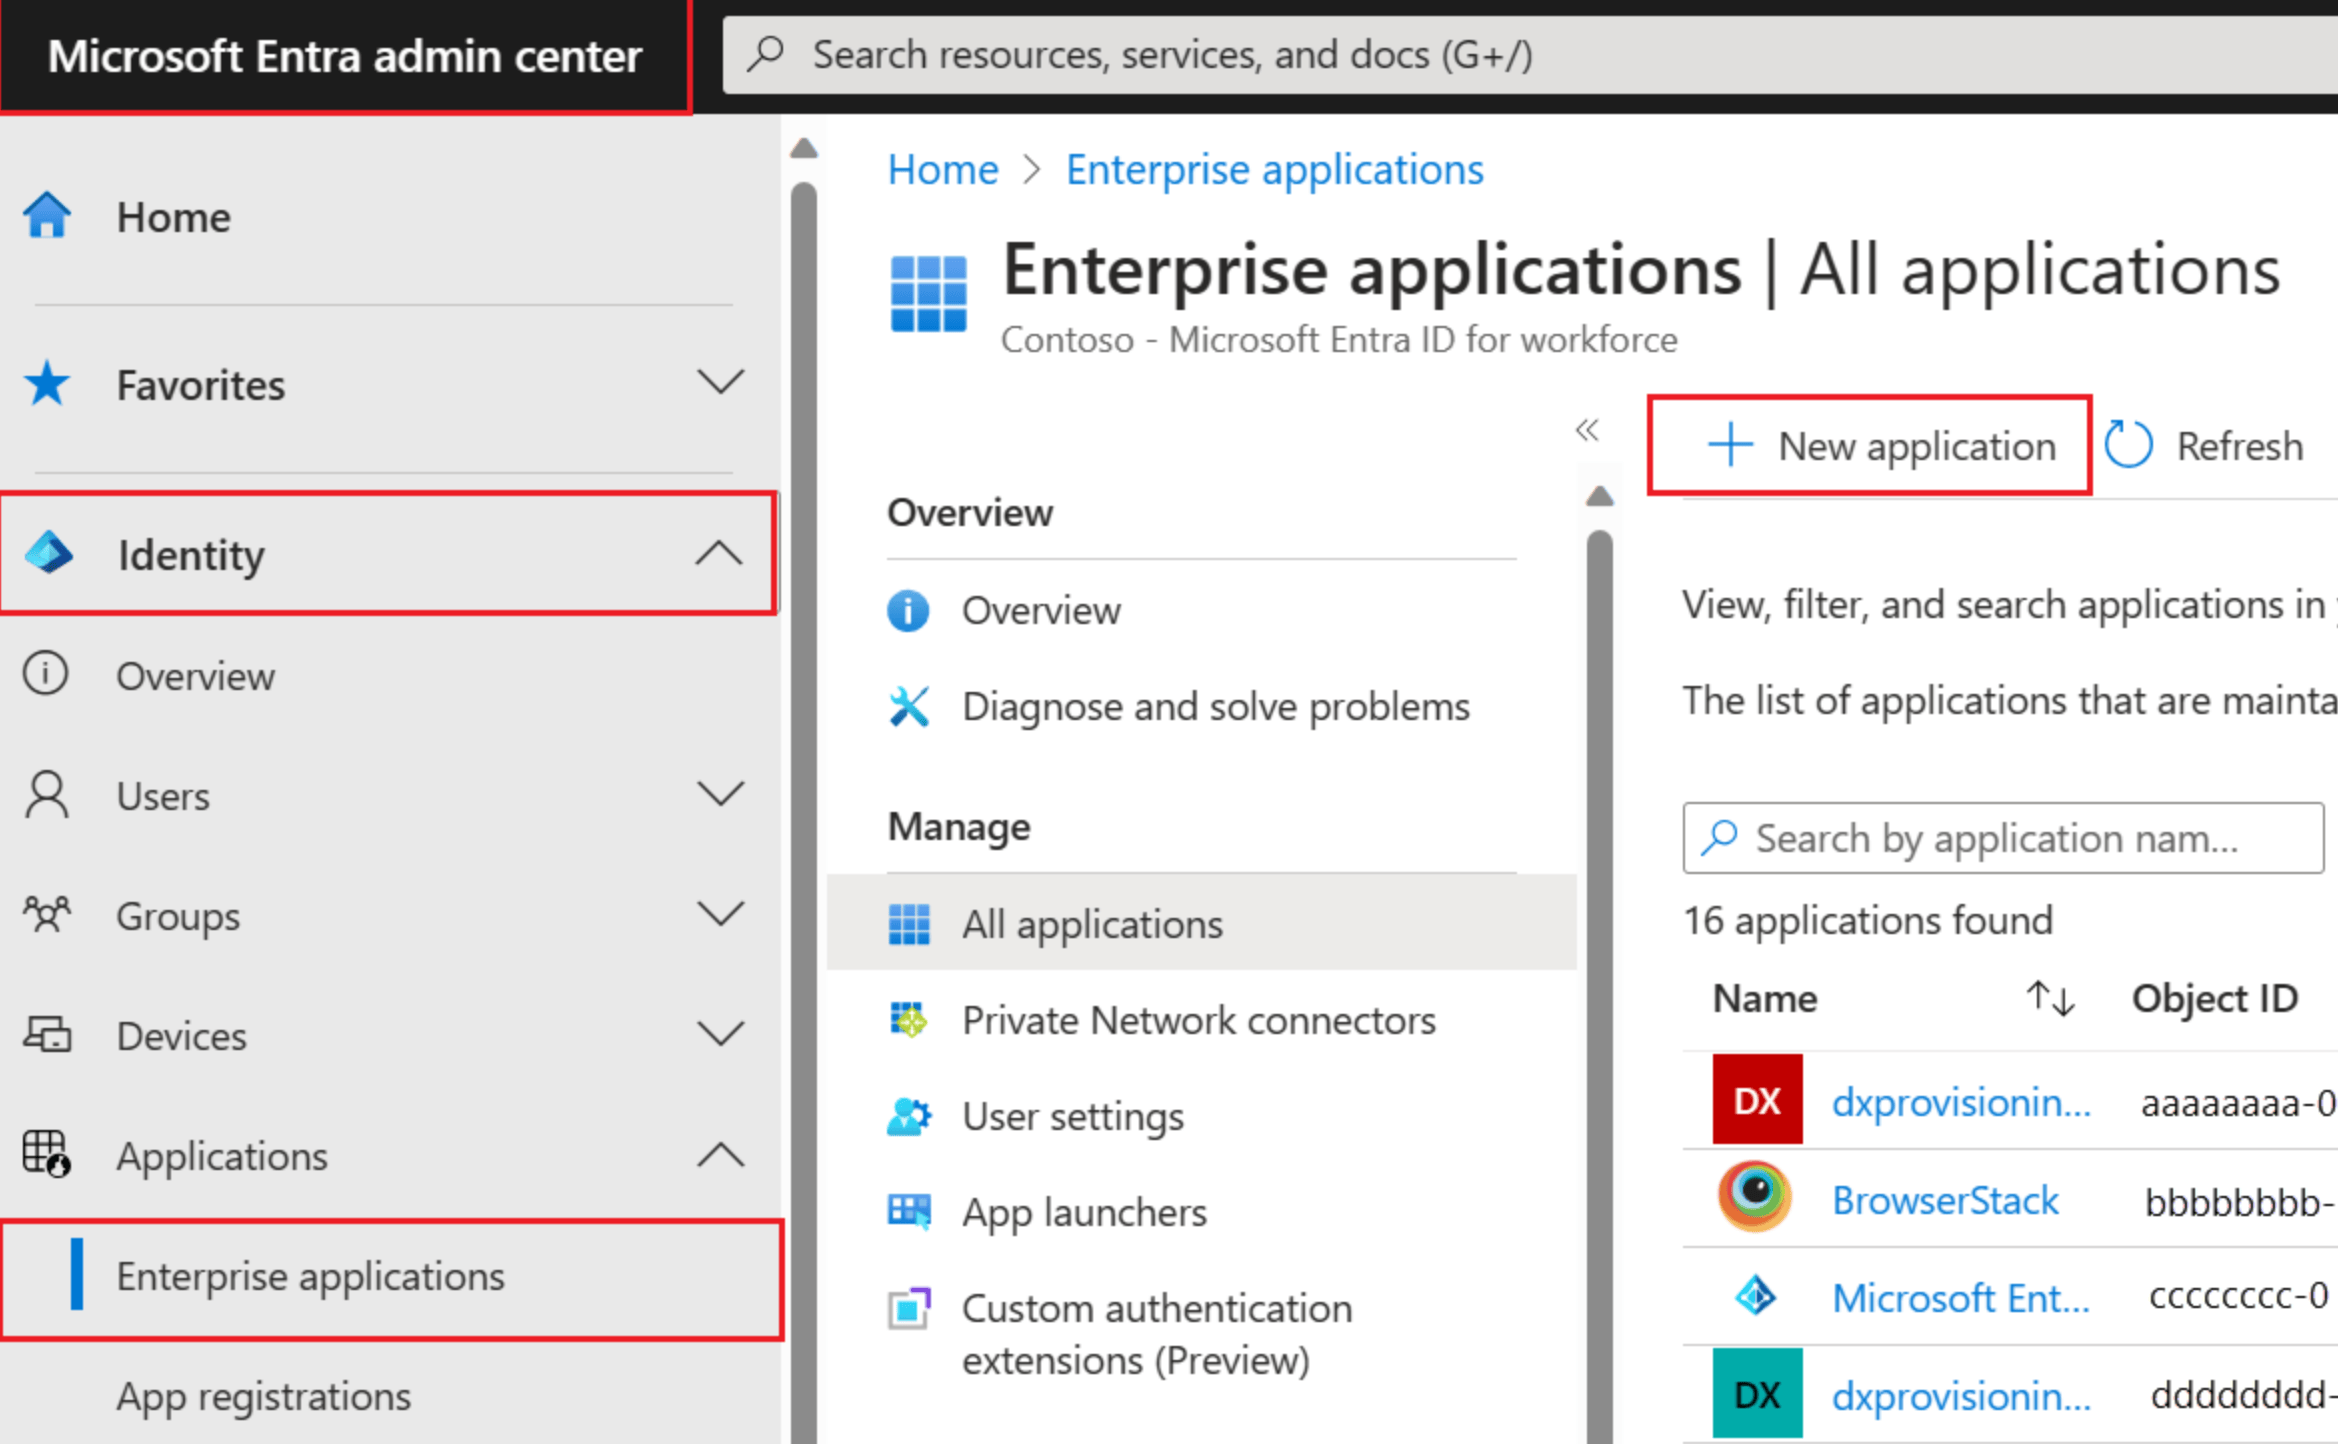
Step 1: Create the Enterprise Application
Sign in to the Entra or Azure Portal and navigate to Enterprise Applications
Click New application
Search for "API-driven" and select API-driven provisioning to on-premises Active Directory
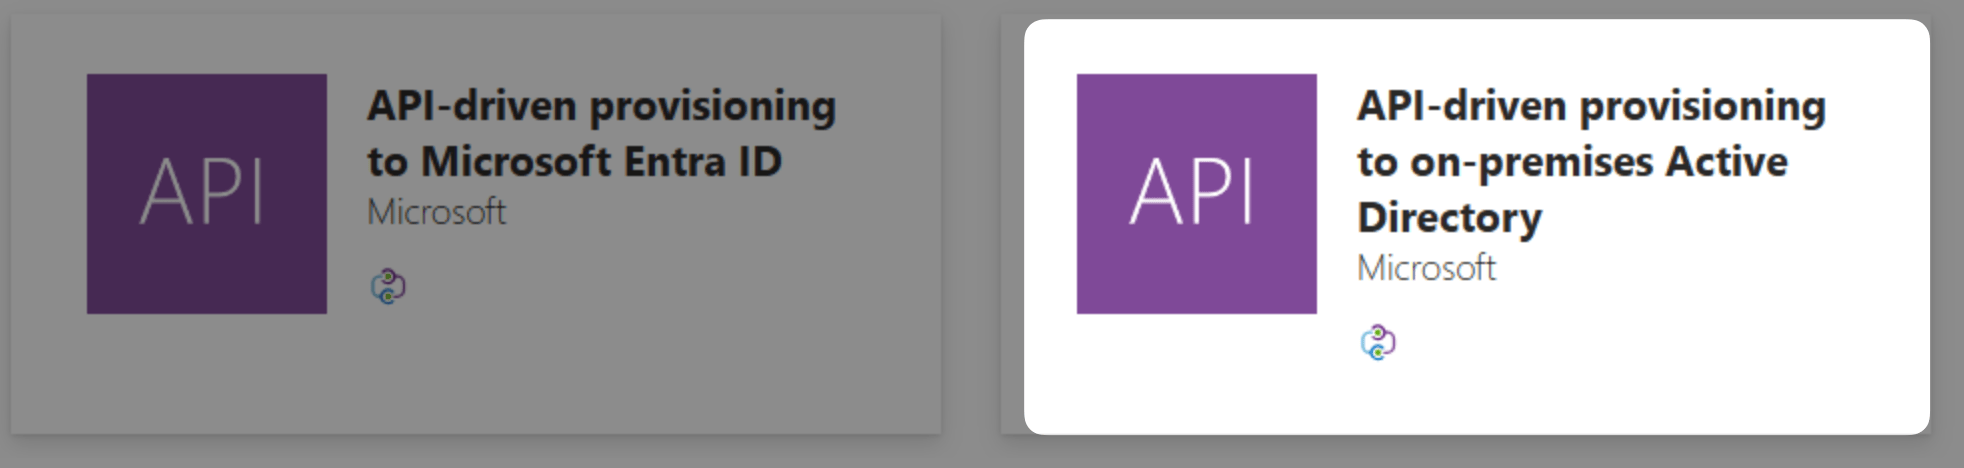
Give the application a meaningful name (such as "OnPrem-AD-Provisioning") and click Create

Step 2: Configure Provisioning Settings
Open the newly created app and browse to the Provisioning tab
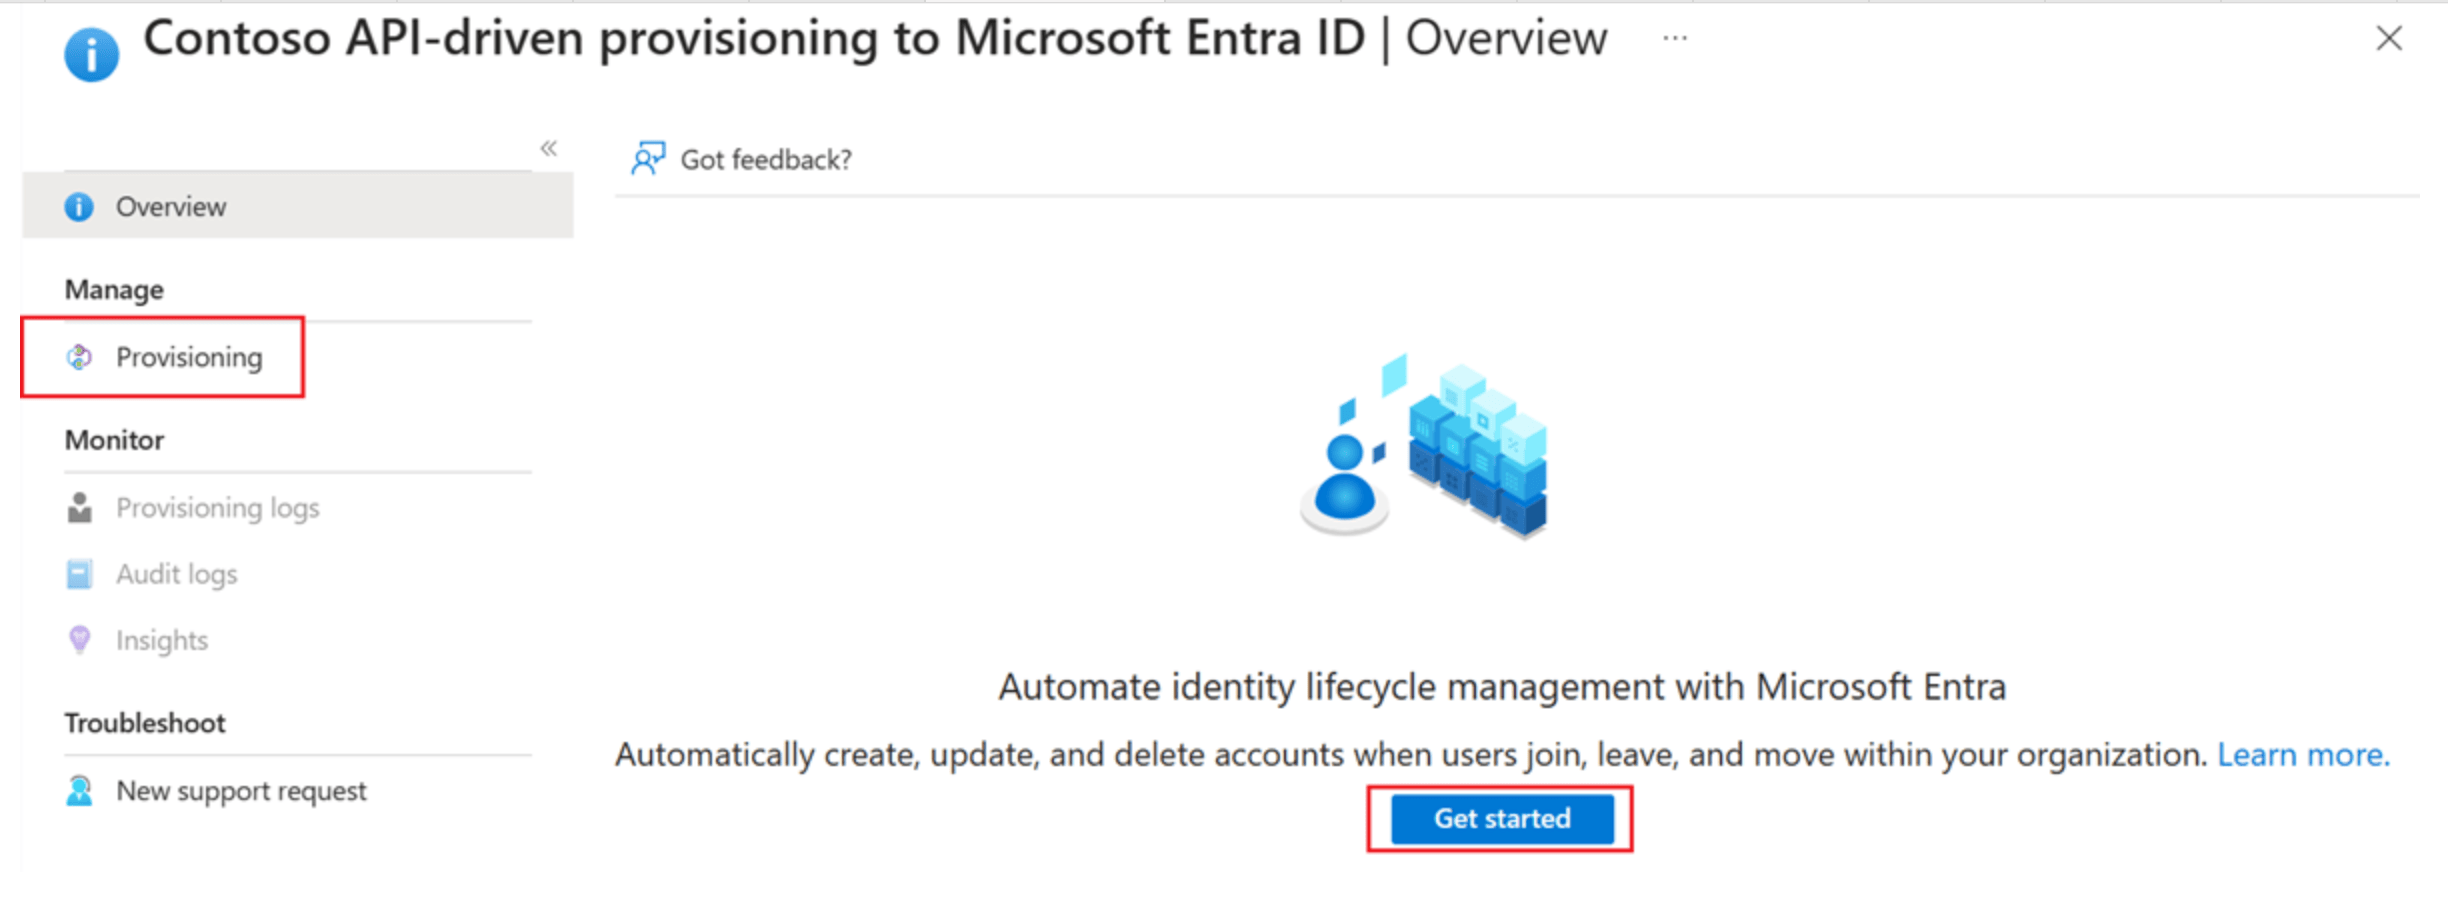
Set Provisioning Mode to Automatic
Download the connector agent that needs to be installed on an on-premises server
Step 3: Install the Provisioning Agent On-Premises
- Switch to an on-premises server where you'll install the Microsoft Entra provisioning agent
- Run the downloaded agent installer
- Select HR-driven provisioning when prompted
- Authenticate to Entra ID with an account that has at least the Hybrid Identity Administrator role
- Provide domain admin credentials to create the required group managed service account
- Wait for the configuration to complete (this may take a few minutes)
Step 4: Complete the Cloud Configuration
- Return to the Entra portal and the provisioning tab of your application
- Fill in the Default OU for new users path in your Active Directory (this need to to be fully qualified and can be retrieved from ADSI Edit)
- Select the domain where you installed the connector
- Scroll down to review the Mappings section
- Verify that the default mapping is configured to use the employeeID attribute (or change it to match your organisation's requirements)
- Click Save to finalise the configuration
Step 5: Start Provisioning and Note the API Endpoint
- Navigate to the Overview tab
- Click the button to start provisioning
- Note the Provisioning API Endpoint URL - this is the crucial piece you'll need for the Logic App
This endpoint URL will be used in the Logic App's HTTP POST action when disabling on-premises accounts covered in Right Branch: Disabling in On-Premises AD. It contains your service principal ID and synchronisation job ID that are needed for the API calls.
Important: Make sure to copy the full Provisioning API Endpoint URL. You'll need to paste it into the URI for the Logic App's HTTP POST request that disables on-premises accounts.
You can also check out how Peter Klapwijk did it—same process, plus his blog is a great read!

Building Your Account Lockdown Automation: A Journey Complete
We've walked through the complete process of creating a robust security automation solution that bridges cloud and on-premises environments to respond to security incidents automatically. Let's recap what we've accomplished:
Our solution uses Graph API calls to disable accounts in Entra ID and leverages the provisioning API with SCIM protocol to reach into on-premises Active Directory. We also implemented comprehensive status tracking and incident documentation to create a clear audit trail of all automated actions.
This automation dramatically reduces response time from minutes or hours to mere seconds, ensuring consistent execution of security protocols across hybrid environments. By implementing this solution along with an Automation Rule, your security team can focus on complex investigation and remediation activities while knowing that initial containment steps happen automatically when incidents occur.
In an upcoming blog, we'll expand this automation framework to include advanced security measures like session revocation and multi-factor authentication removal, further enhancing the comprehensive account protection capabilities of this powerful security solution.
What security automation challenge would you like to tackle next?

I hope you've found this guide helpful in enhancing your security posture. If you've enjoyed this content and would like to support more like it, please consider joining the Supporters Tier. Your support helps me continue creating practical security automation content for the community.