Automating Security: Creating Microsoft Sentinel Watchlists from Entra ID Group Membership
Automating Sentinel Watchlists with Entra ID Groups and Logic Apps

Introduction
Security teams often need to maintain lists of important users, accounts, or entities for monitoring and detection purposes. Microsoft Sentinel watchlists provide a powerful way to store such data for correlation with security events. In this blog post, we'll walk through automating the creation of Sentinel watchlists based on Entra ID (formerly Azure AD) group membership using Logic Apps.
This approach allows security teams to maintain user lists in Entra ID groups and automatically synchronise those memberships to Sentinel watchlists, ensuring your detection rules always have up-to-date information.
Prerequisites
- Microsoft Sentinel workspace
- Logic App with System Assigned Managed Identity
- Appropriate permissions on Entra ID and Sentinel
- A security group in Entra ID containing the members you want to monitor
Step 1: Create a Logic App with System Assigned Managed Identity
First, we need to create a Logic App with a System Assigned Managed Identity that will have permissions to read Entra ID groups and manage Sentinel watchlists.
- Navigate to the Azure portal and create a new Logic App
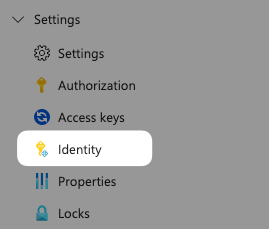
- Once created, go to Identity under Settings
- Switch the Status to On under the System assigned tab
- Click Save to create the managed identity
After enabling the System Assigned Managed Identity, you'll see that your Logic App now has an Object (principal) ID. Make note of this ID as you'll need it for the role assignments.
Now we need to grant the managed identity the necessary permissions to work with Microsoft Sentinel. There are two ways to do this:
Option 1: Assign roles directly from the Logic App
- In your Logic App's Identity page, click on Azure role assignments
- Click Add role assignment
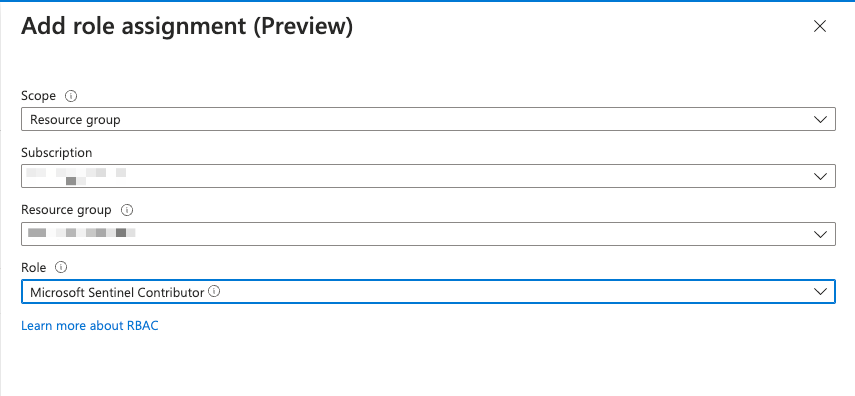
- Configure the role assignment:
- Scope: Resource group
- Subscription: Select your subscription
- Resource group: Select the resource group containing your Sentinel workspace
- Role: Microsoft Sentinel Contributor
- Click Save
Option 2: Assign roles from the Sentinel workspace
- Navigate to your Microsoft Sentinel workspace
- Go to Access control (IAM)
- Click Add > Add role assignment
- Select the Microsoft Sentinel Contributor role
- Click Next
- Under Assign access to, select Managed identity
- Click + Select members
- Find and select your Logic App's managed identity
- Click Select and then Review + assign
The Microsoft Sentinel Contributor role is necessary because our workflow will need to:
- Read existing watchlists
- Delete watchlist items
- Create new watchlists and add items
Without these permissions, the Logic App won't be able to manage the watchlists properly.
Step 2: Assign Microsoft Graph API Permissions
For our Logic App to read group membership from Entra ID, we need to assign it the appropriate Microsoft Graph permissions. We'll use PowerShell to assign these permissions to the managed identity:
# Connect to Microsoft Graph
Connect-MgGraph -Scopes "AppRoleAssignment.ReadWrite.All"

# Set your managed identity's object ID
$miObjectId = "YOUR-MANAGED-IDENTITY-OBJECT-ID"

# Microsoft Graph service principal ID
$graphId = "00000003-0000-0000-c000-000000000000"

# Get Microsoft Graph service principal
$graphSP = Get-MgServicePrincipal -Filter "appId eq '$graphId'"

# Get required app roles from Microsoft Graph
$roles = @{
    "Group.Read.All" = $graphSP.AppRoles | Where-Object { $_.Value -eq "Group.Read.All" }
    "Directory.Read.All" = $graphSP.AppRoles | Where-Object { $_.Value -eq "Directory.Read.All" }
}

# Create parameter hashtable
$params = @{
    ServicePrincipalId = $miObjectId
    PrincipalId = $miObjectId
    ResourceId = $graphSP.Id
}

# Assign permissions
foreach ($role in $roles.Keys) {
    $roleParams = $params.Clone()
    $roleParams.AppRoleId = $roles[$role].Id

    New-MgServicePrincipalAppRoleAssignment @roleParams
    Write-Host "Assigned $role permission" -ForegroundColor Cyan
}

Write-Host "All Graph permissions assigned!" -ForegroundColor Green
Make sure to replace YOUR-MANAGED-IDENTITY-OBJECT-ID with your Logic App's managed identity object ID, which you can find in the Identity section of your Logic App.
Step 3: Configure Logic App Parameters
Before building the workflow, let's set up parameters that will allow our Logic App to be more flexible and reusable. These parameters will store important configuration values that might change between environments.
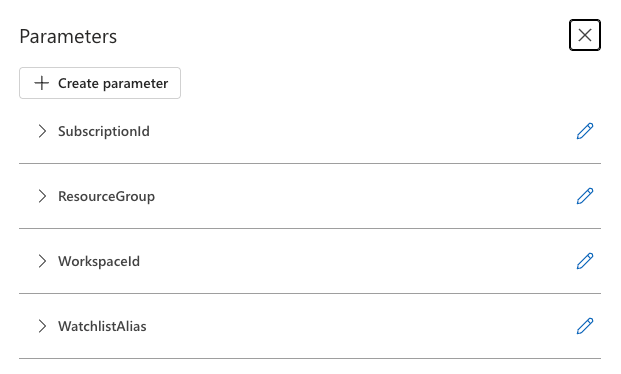
- In your Logic App designer, click on Parameters in the top menu
- Click Create parameter to add each of the following:
- SubscriptionId: Your Azure subscription ID
- ResourceGroup: The resource group containing your Sentinel workspace
- WorkspaceId: Your Sentinel workspace ID
- WatchlistAlias: The alias for your watchlist (e.g., "EntraIDUsers")
These parameters can then be referenced throughout your workflow using the parameters('ParameterName')expression, making your Logic App more maintainable and easier to move between environments.
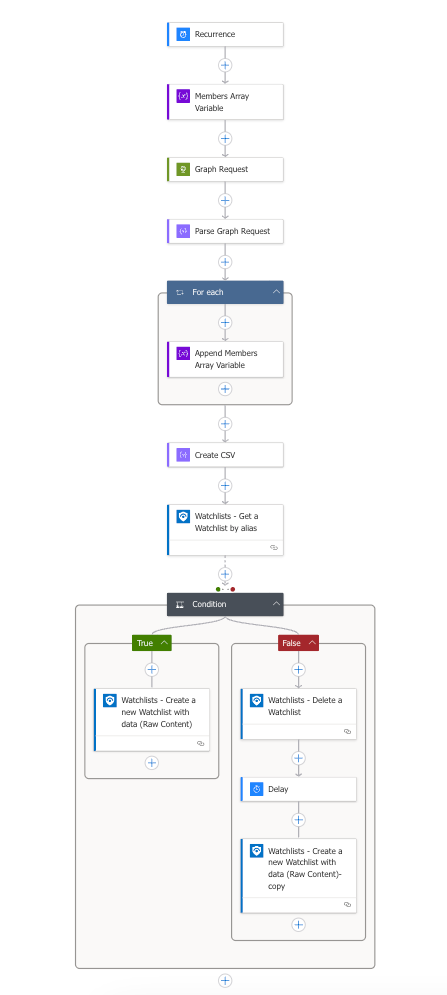
Step 4: Build the Logic App Workflow
Now let's build our Logic App workflow:
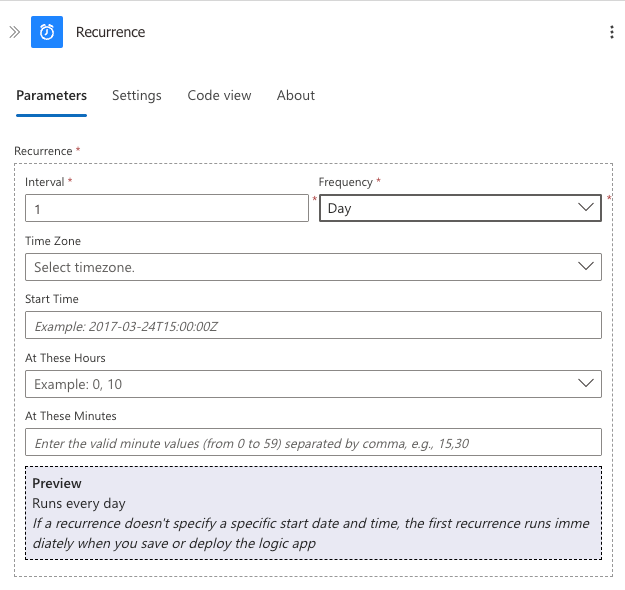
Trigger: Recurrence
Start with a recurrence trigger to run the workflow at regular intervals. You might want to run it daily or weekly depending on how frequently your group membership changes.
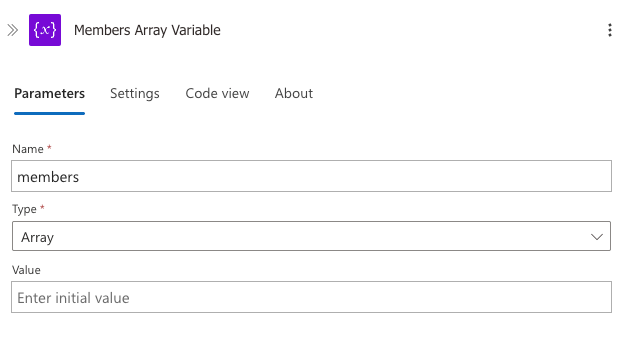
Step 1: Initialise Members Array Variable
Create a variable to store the members we'll retrieve:
Step 2: Graph Request to Get Group Members
Add an HTTP action to query Microsoft Graph API. This action requires proper authentication configuration to use the managed identity:
- Add an HTTP action to your workflow
- Set the method to GET
- Click on Add Authentication
- Configure authentication with the following settings:
- Authentication Type: Managed identity
- Managed Identity: System-assigned managed identity
- Audience: https://graph.microsoft.com
For the URI, enter:
https://graph.microsoft.com/v1.0/groups/YOUR-GROUP-ID/members?$select=id,displayName,userPrincipalName
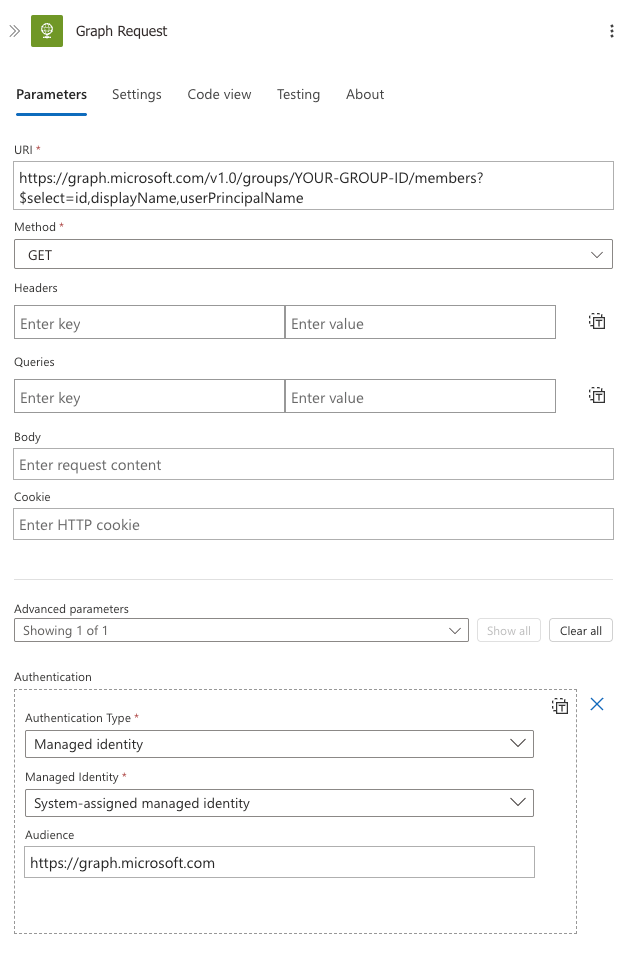
Replace YOUR-GROUP-ID with the object ID of your Entra ID group. Note that we're using the $select parameter to only retrieve the properties we need.
Step 3: Parse Graph Request Response
Use the Parse JSON action to process the response from the Graph API request:
Add a Parse JSON action after your HTTP request
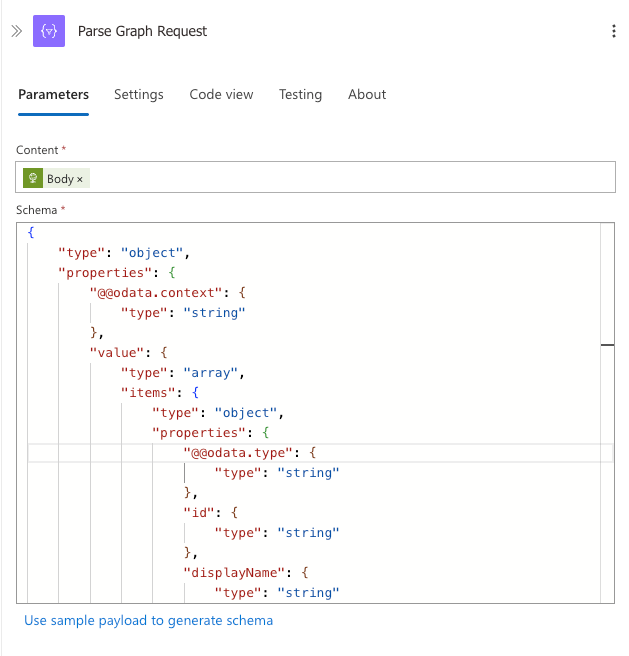
- For the Content field, make sure to select the "Body" output from the HTTP action (Graph Request)
- Enter the following schema to properly parse the user data:
{
    "type": "object",
    "properties": {
        "@@odata.context": {
            "type": "string"
        },
        "value": {
            "type": "array",
            "items": {
                "type": "object",
                "properties": {
                    "@@odata.type": {
                        "type": "string"
                    },
                    "id": {
                        "type": "string"
                    },
                    "displayName": {
                        "type": "string"
                    },
                    "userPrincipalName": {
                        "type": "string"
                    }
                },
                "required": [
                    "@@odata.type",
                    "id",
                    "displayName",
                    "userPrincipalName"
                ]
            }
        }
    }
}
Parse HTTP Response Schema
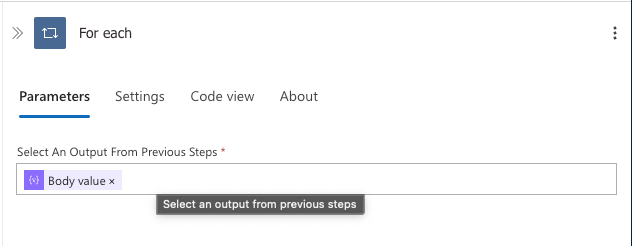
Step 4: For Each Value, Append to Array
Now we need to process each member returned from the Graph API and build our array of users:
- Add a For each control action
- For the "Select an Output from Previous Steps" field, select the array of values from the Parse JSON action:
- Click in the field
- From the dynamic content panel, select
Body valueunder the Parse JSON action - This corresponds to the
body('Parse_Graph_Request')?['value']expression
- Inside the For each loop, add an Append to array variable action:
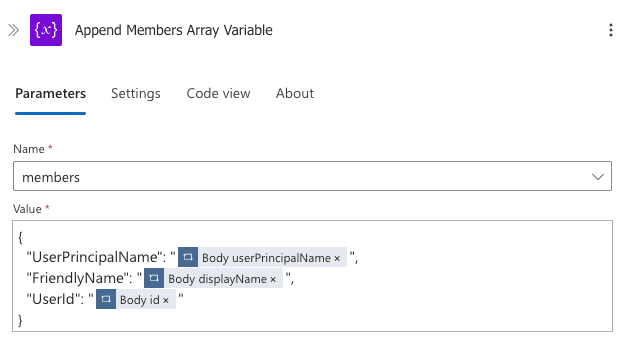
- Select the
Members_Array_Variablewe created earlier - For the Value, create an object with the following properties:
{
  "UserPrincipalName": "@{item()?['userPrincipalName']}",
  "FriendlyName": "@{item()?['displayName']}",
  "UserId": "@{item()?['id']}"
}
Step 5: Create CSV for Watchlist
Next, we need to convert our array of users to CSV format. This step is necessary because Sentinel watchlists require data to be in CSV format for import. The CSV format allows for structured data with consistent columns that Sentinel can parse and index for efficient querying.
Add a Create CSV action with the following configuration:
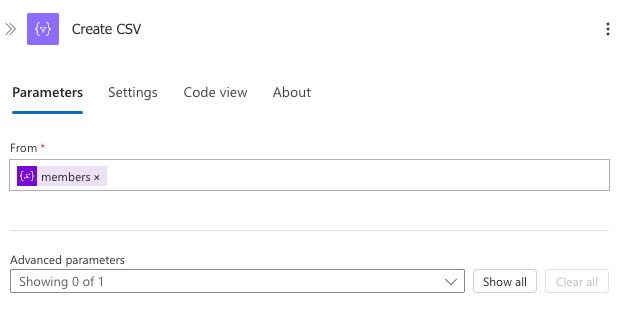
This action takes our array of user objects and transforms it into a properly formatted CSV with headers matching our object property names (UserPrincipalName, DisplayName, and UserId). The resulting CSV will be directly compatible with Sentinel's watchlist import requirements.
Step 6: Check if Watchlist Exists
Next, we need to check if our watchlist already exists. This is an important step because we want to ensure we always have the most up-to-date membership data without creating duplicate watchlists or entries.
When we find an existing watchlist, we'll delete it and recreate it with fresh data rather than trying to update individual entries. This approach ensures complete synchronisation and prevents potential data inconsistencies that might occur when members are removed from groups.
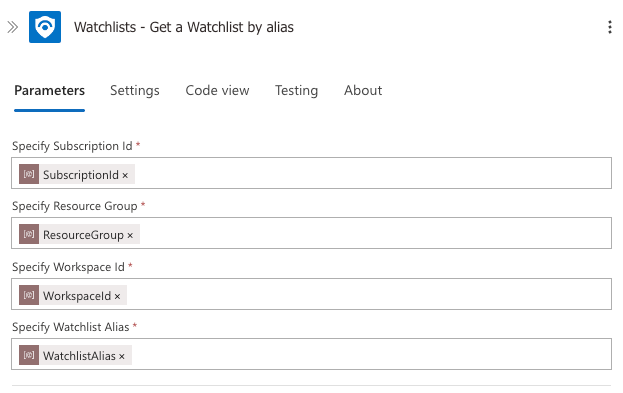
Note how we're using the parameters we defined earlier to make the Logic App more flexible and reusable.
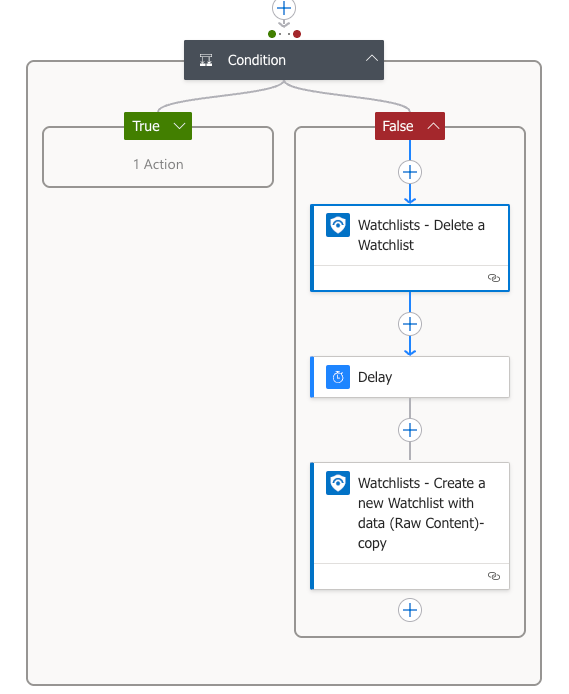
Step 7: Conditional - Create or Recreate Watchlist
Based on the response, we'll either create a new watchlist (if it doesn't exist) or completely recreate it (if it does exist). We're not updating the existing watchlist - we're deleting it and recreating it from scratch to ensure complete data accuracy.
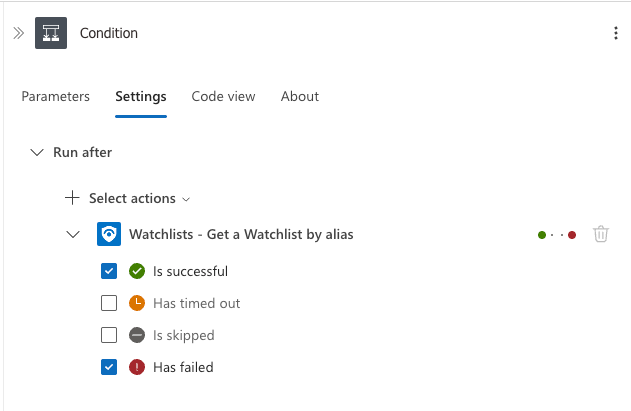
When setting up the Condition action, we need to configure it to check both successful and failed responses from the previous step:
- In the Condition action settings, configure "Run after" to include:
- ✓ Is successful
- ✓ Has failed
For the condition itself, we need to check if the watchlist exists:
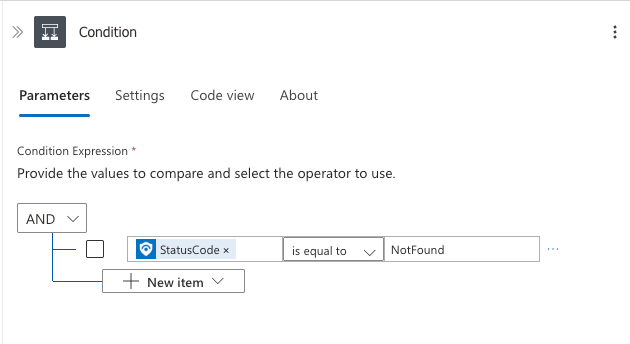
Use this expression to populate StatusCode
body('Watchlists_-_Get_a_Watchlist_by_alias')?['StatusCode']
This condition checks if the status code from the "Get a Watchlist" action is 200 (OK), which means the watchlist exists.
This configuration is crucial because we want our workflow to handle both scenarios:
- If the watchlist exists (condition is true), we'll delete and recreate it
- If the watchlist doesn't exist (condition is false), we'll create a new one from scratch
By checking both success and failure conditions in the "Run after" settings, our Logic App will still work properly even if the API call returns an error, providing more resilient error handling.
If TRUE Path (Watchlist Doesn't Exist)
When the condition evaluates to true (status code is 200), it means we can create a new watchlist directly:
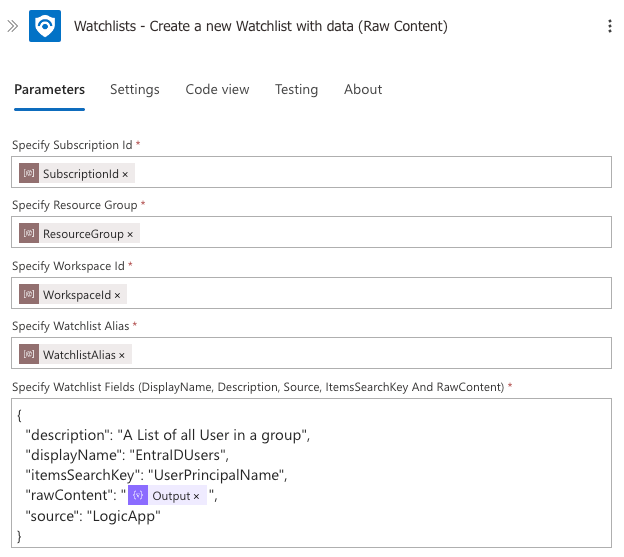
- Add a Create a new Watchlist with data (Raw Content) action to create a watchlist with the data
Configuration:
- Subscription Id: Select the parameter
SubscriptionId - Resource Group: Select the parameter
ResourceGroup - Workspace Id: Select the parameter
WorkspaceId - Watchlist Alias: Select the parameter
WatchlistAlias
Note again how we're using the parameters we defined earlier to make the Logic App more flexible and reusable.
Enter the JSON below and update the details relevant to your environment and group.
{
  "description": "A List of all User in a group",
  "displayName": "EntraIDUsers",
  "itemsSearchKey": "UserPrincipalName",
  "rawContent": "@{body('Create_CSV')}",
  "source": "LogicApp"
}
If FALSE Path (Watchlist Exists)
When the condition evaluates to false, it means the watchlist already exists and we need to recreate it:
Add a Delete a Watchlist action to remove all existing items
Configuration:
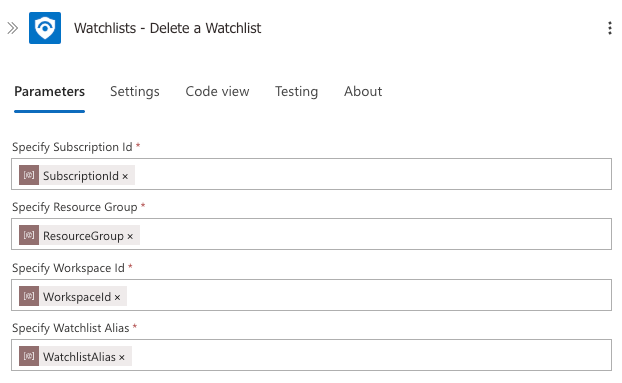
- Subscription Id: Select the parameter
SubscriptionId - Resource Group: Select the parameter
ResourceGroup - Workspace Id: Select the parameter
WorkspaceId - Watchlist Alias: Select the parameter
WatchlistAlias
Add a Delay action (10 seconds) to allow the API to process the deletion
After deleting the watchlist items, we need to add a delay before recreating the watchlist. This step is critical for allowing the Microsoft Sentinel API to process the deletion completely before attempting to create new items.

Configuration:
- Interval: 10 seconds
This delay ensures that our synchronisation process works reliably. Without this delay, you might encounter race conditions where the Sentinel API hasn't fully processed the deletion before attempting to add new items, resulting in potential errors or duplicate data.
Add a Create a new Watchlist with data (Raw Content) action to create a watchlist with the new data
For recreating the watchlist with new data (when it already exists).
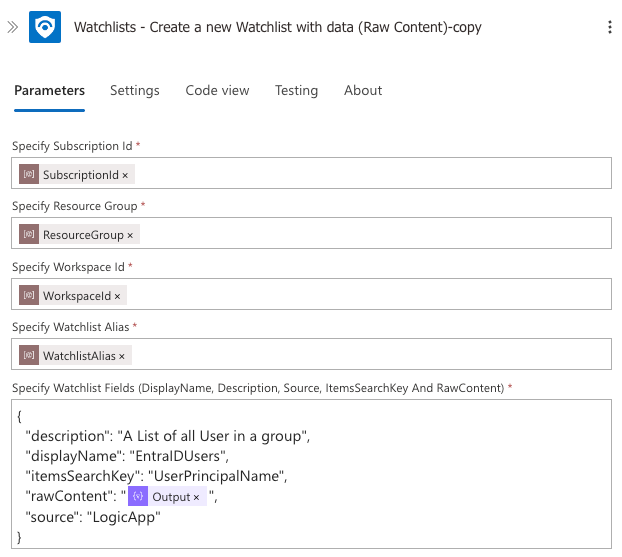
Configuration:
- Subscription Id: Select the parameter
SubscriptionId - Resource Group: Select the parameter
ResourceGroup - Workspace Id: Select the parameter
WorkspaceId - Watchlist Alias: Select the parameter
WatchlistAlias - Watchlist Fields: Enter a JSON object
{
  "description": "A List of all User in a group",
  "displayName": "EntraIDUsers",
  "itemsSearchKey": "UserPrincipalName",
  "rawContent": "@{body('Create_CSV')}",
  "source": "LogicApp"
}
By checking both success and failure conditions in the "Run after" settings, our Logic App will still work properly even if the API call returns an error, providing more resilient error handling.
Testing and Verification
After setting up your Logic App:
- Run the workflow manually to test it by clicking the "Run Trigger" button
- Monitor the run history to ensure all steps execute successfully
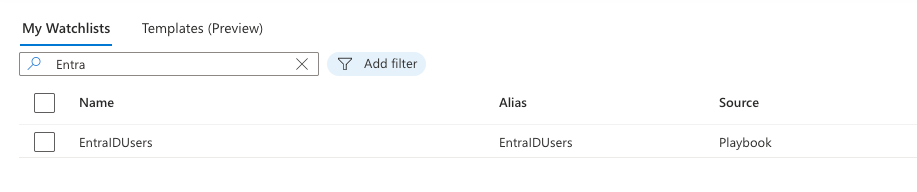
- Navigate to Microsoft Sentinel
- Go to Watchlists
- Verify that your "Entra ID Users" watchlist has been created with the correct members
- Check that the UserPrincipalName, DisplayName, and UserId columns contain the expected data
Using the Watchlist in Analytics Rules
Now that you have your watchlist created, you can use it in Sentinel analytics rules. Here's an example KQL query that uses the watchlist to detect failed sign-ins for your important users:
let EntraIDUsers = _GetWatchlist('EntraIDUsers')
    | project UserPrincipalName;
SigninLogs
| where UserPrincipalName in (EntraIDUsers)
| where ResultType != 0
| project TimeGenerated, UserPrincipalName, IPAddress
    , ResultType, ResultDescription, Location
Microsoft Sentinel - Query Watchlist
This query:
- Loads your Entra ID users watchlist
- Filters the SigninLogs to only show entries for UserPrincipalNames in the watchlist
- Filters for non-successful sign-in attempts (ResultType != 0)
- Projects the most relevant columns for analysis
You can easily adapt this query to build other detection rules focused on your critical users, such as:
- Suspicious activity detection
- Geographic anomalies
- Resource access monitoring
- Privilege escalation attempts
This query filters sign-in logs to only show failed sign-ins for users in your watchlist.
Benefits of Recreating vs. Updating Watchlists
You might wonder why we're choosing to delete and recreate the watchlist rather than updating it. Here are the key benefits of this approach:
- Complete Accuracy: Recreating ensures the watchlist exactly matches the current group membership, with no stale entries.
- Simplicity: Handling the removal of members is complex when updating incrementally - recreating is more straightforward.
- Performance: For reasonably sized groups, it's more efficient to recreate than to perform complex difference calculations.
- Consistency: The watchlist will be in a known state after each run, making troubleshooting easier.
Conclusion
By automating the synchronisation between Entra ID groups and Microsoft Sentinel watchlists, you've created a powerful solution that:
- Maintains a single source of truth for your important users in Entra ID
- Automatically updates Sentinel watchlists without manual intervention
- Enables more effective analytics rules that can reference up-to-date user information
- Reduces administrative overhead for security teams
This pattern can be extended to other scenarios, such as syncing device information, application data, or other security-relevant entities to Sentinel watchlists.
Remember to ensure your Logic App's managed identity has the minimum permissions needed for security best practices. You may want to consider implementing error handling and notifications if the workflow fails for any reason.
I hope you've found this guide helpful in enhancing your security posture. If you've enjoyed this content and would like to support more like it, please consider donating to the tip jar. Your support helps me continue creating practical security automation content for the community.
Happy automating!