Automating Microsoft Sentinel Deployment with GitHub Actions

Deploying Microsoft Sentinel resources manually can be time-consuming and error-prone. By leveraging GitHub Actions and Infrastructure as Code principles, we can automate the deployment of Sentinel solutions, analytical rules, and workbooks with a single push to our repository.
This guide walks through setting up automated Sentinel deployment using a GitHub Action workflow that connects to Azure via federated authentication.
This could be useful if you just want to try Microsoft Sentinel, without the requirement of many many clicks through the platform.
Prerequisites
Before we begin, you'll need:
- An Azure subscription with Microsoft Sentinel enabled
- A GitHub repository for your Sentinel-as-Code project fork
- Administrative access to create Entra ID app registrations
Setting Up Federated Authentication with Entra ID
The first step is establishing secure authentication between GitHub Actions and Azure without storing sensitive credentials in your repository.
Creating the Entra ID App Registration
- Navigate to the Azure portal and open Entra ID (formerly Azure Active Directory)
- Select App registrations from the left menu
- Click New registration
- Provide a meaningful name like "GitHub-Sentinel-Deployment"
- Leave the default settings and click Register
Configuring Federated Credentials
Once your app registration is created, you'll need to set up the federated identity credentials:
- In your new app registration, navigate to Certificates & secrets
- Select the Federated credentials tab
- Click Add credential
- Choose GitHub Actions deploying Azure resources as the scenario
- Fill in your repository details:
- Organisation: Your GitHub username or organisation
- Repository: Your repository name
- Entity type: Branch
- Branch name: main
- Provide a name and description for the credential
- Click Add
Assigning Azure Permissions
Your app registration needs appropriate permissions to manage Sentinel resources:
- Navigate to your Resource Group in the Azure portal
- Select Access control (IAM)
- Click Add role assignment
- Choose Microsoft Sentinel Contributor role
- Select your app registration as the member
- Complete the assignment
Configuring GitHub Repository Variables
Your GitHub repository needs several configuration variables and secrets. Navigate to your repository settings and add these:
Secrets
SENTINEL_CLIENTID: Your app registration's Application (client) IDSENTINEL_TENANTID: Your Azure tenant IDSENTINEL_SUBSCRIPTIONID: Your Azure subscription ID
Variables
RESOURCE_GROUP: Name of your resource group containing SentinelWORKSPACE_NAME: Your Log Analytics workspace nameREGION: Azure region (e.g., "UK South")SENTINEL_SOLUTIONS: Comma-separated list of solutions to deploy- "Azure Activity","Azure Key Vault","Azure Logic Apps"
AR_SEVERITIES: Alert rule severities to include (e.g., "High,Medium")
Understanding the Workflow
The GitHub Action workflow automatically triggers on pushes to the main branch and can also be manually executed. Let's break down the key components:
Authentication Step
- name: Login to Azure
  uses: azure/login@v2
  with:
    client-id: ${{ secrets.SENTINEL_CLIENTID }}
    tenant-id: ${{ secrets.SENTINEL_TENANTID}}
    subscription-id: ${{ secrets.SENTINEL_SUBSCRIPTIONID }}
    environment: 'AzureCloud'
    audience: api://AzureADTokenExchange
    enable-AzPSSession: true
This step uses the federated credentials we configured earlier, eliminating the need for storing sensitive client secrets.
Deployment Step
The workflow executes a PowerShell script that handles the actual Sentinel configuration:
- name: Enable Sentinel Solutions and Alert Rules
  uses: azure/powershell@v1
  with:
    inlineScript: |
      & "${{ github.workspace }}/Scripts/Set-SentinelContent.ps1" `
        -ResourceGroup '${{ vars.RESOURCE_GROUP }}' `
        -Workspace '${{ vars.WORKSPACE_NAME }}' `
        -Region '${{ vars.REGION }}' `
        -Solutions ${{ vars.SENTINEL_SOLUTIONS }} `
        -SeveritiesToInclude ${{ vars.AR_SEVERITIES }} `
        -IsGov 'false'
Repository Structure
Your repository will have the following structure:
sentinel-as-code/
├── .github/
│   └── workflows/
│       └── deploy-sentinel.yml
├── Scripts/
│   └── Set-SentinelContent.ps1
└── README.md
Monitoring Deployments
Once configured, every push to your main branch will trigger the deployment workflow. You can monitor progress in the Actions tab of your GitHub repository.
The workflow includes error handling with continue-on-error: true flags, ensuring that partial failures don't halt the entire deployment process.
Benefits of This Approach
This automated deployment strategy provides several advantages:
Consistency: Eliminates manual configuration drift between environments Auditability: All changes are tracked through version control Rollback capability: Easy to revert to previous configurations Collaboration: Team members can contribute through standard pull request workflows Security: No long-lived credentials stored in GitHub
Conclusion: Trialling Sentinel with Automated Deployment
Automating Microsoft Sentinel Deployment with GitHub Actions
Deploying Microsoft Sentinel resources manually can be time-consuming and error-prone. By leveraging GitHub Actions and Infrastructure as Code principles, we can automate the deployment of Sentinel solutions, analytical rules, and workbooks with a single push to our repository.
This guide walks through setting up automated Sentinel deployment using a GitHub Action workflow that connects to Azure via federated authentication.
Prerequisites
Before we begin, you'll need:
- An Azure subscription with Microsoft Sentinel enabled
- A GitHub repository for your Sentinel-as-Code project
- Administrative access to create Entra ID app registrations
- PowerShell scripts for Sentinel configuration (referenced as
Set-SentinelContent.ps1)
Setting Up Federated Authentication with Entra ID
The first step is establishing secure authentication between GitHub Actions and Azure without storing sensitive credentials in your repository.
Creating the Entra ID App Registration
- Navigate to the Azure portal and open Entra ID (formerly Azure Active Directory)
- Select App registrations from the left menu
- Click New registration
- Provide a meaningful name like "GitHub-Sentinel-Deployment"
- Leave the default settings and click Register
[Screenshot placeholder: Entra ID app registration creation page]
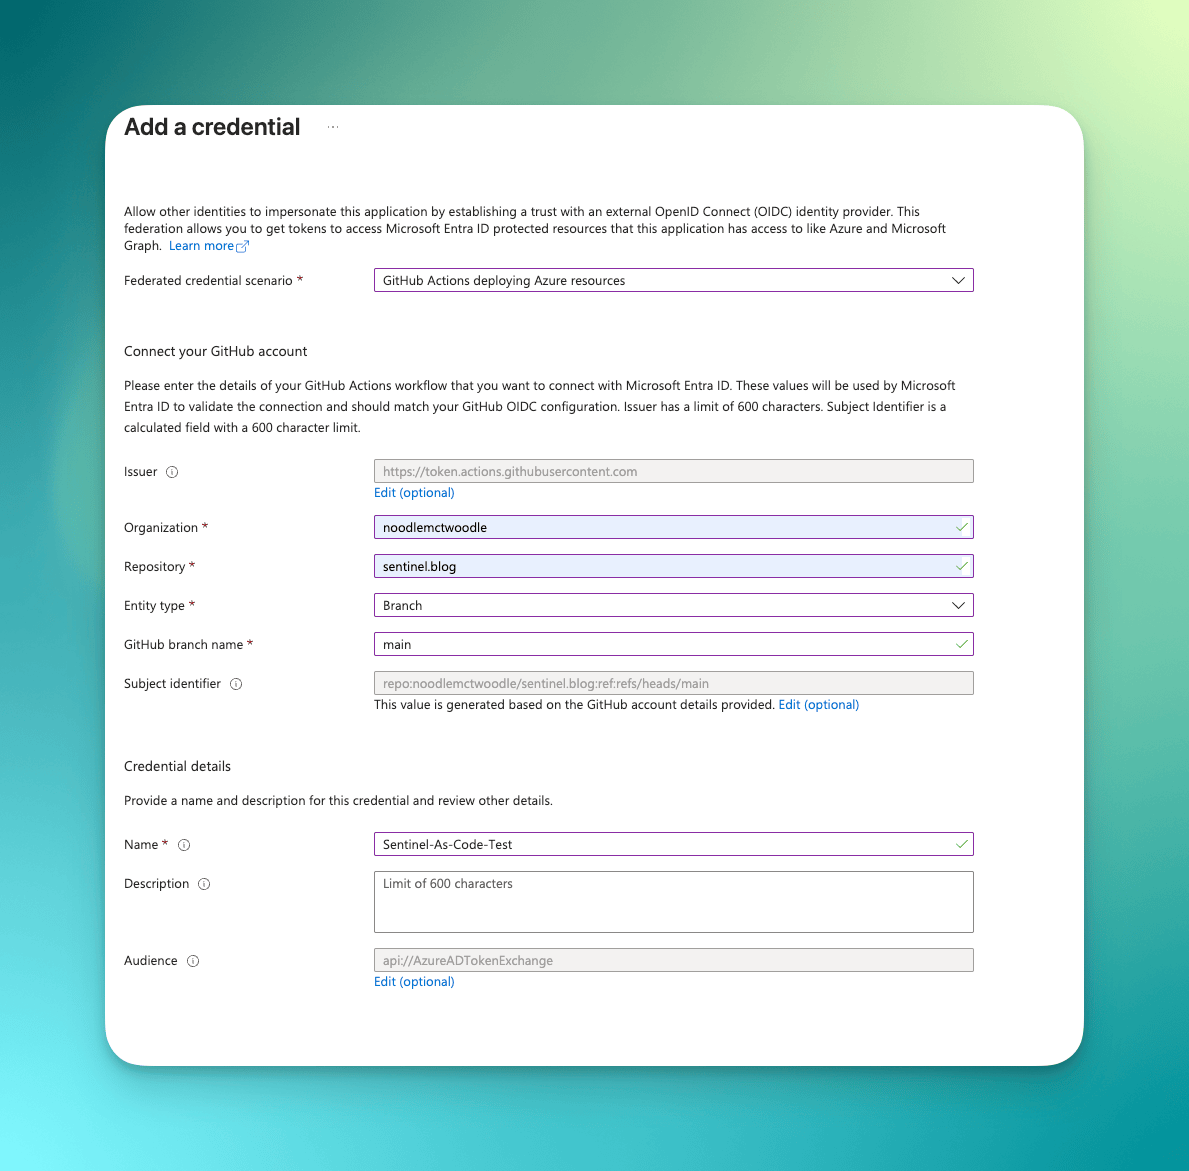
Configuring Federated Credentials
Once your app registration is created, you'll need to set up the federated identity credentials:
- In your new app registration, navigate to Certificates & secrets
- Select the Federated credentials tab
- Click Add credential
- Choose GitHub Actions deploying Azure resources as the scenario
- Fill in your repository details:
- Organisation: Your GitHub username or organisation
- Repository: Your repository name
- Entity type: Branch
- Branch name: main
- Provide a name and description for the credential
- Click Add
[Screenshot placeholder: Federated credentials configuration]
Assigning Azure Permissions
Your app registration needs appropriate permissions to manage Sentinel resources:
- Navigate to your Resource Group in the Azure portal
- Select Access control (IAM)
- Click Add role assignment
- Choose Microsoft Sentinel Contributor role
- Select your app registration as the member
- Complete the assignment
[Screenshot placeholder: Role assignment interface]
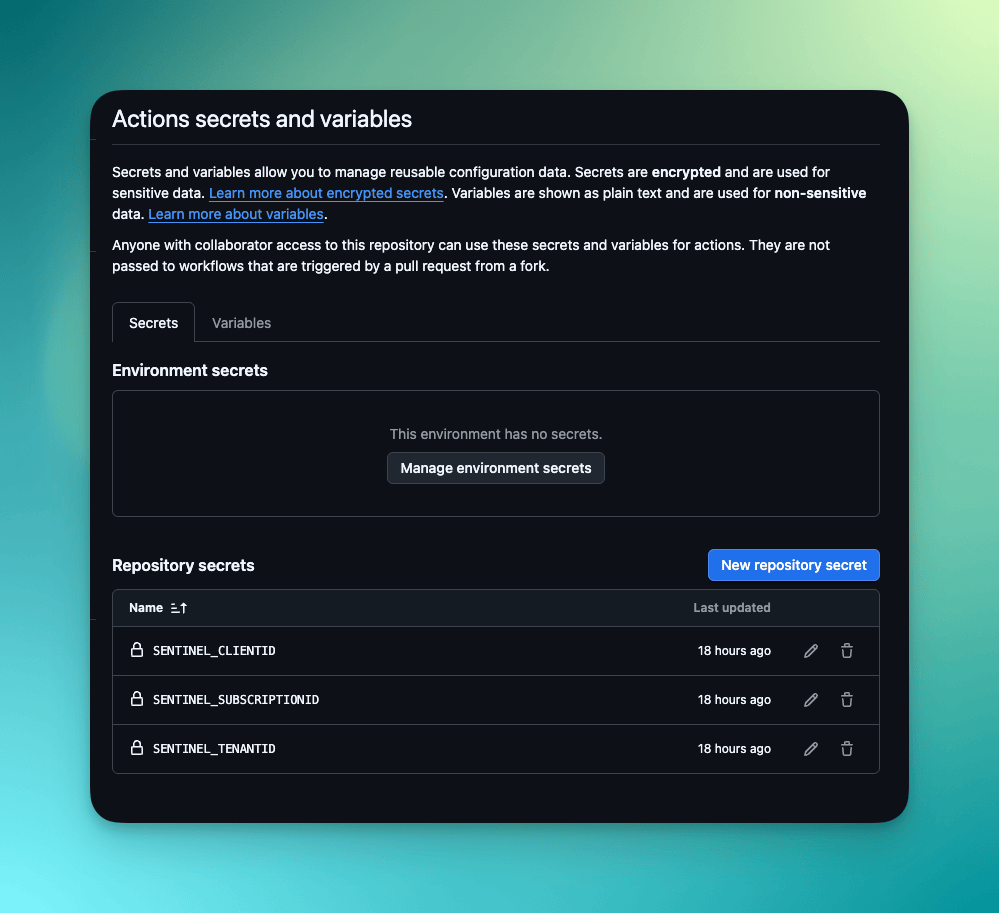
Configuring GitHub Repository Variables
Your GitHub repository needs several configuration variables and secrets. Navigate to your repository settings and add these:
Secrets
SENTINEL_CLIENTID: Your app registration's Application (client) IDSENTINEL_TENANTID: Your Azure tenant IDSENTINEL_SUBSCRIPTIONID: Your Azure subscription ID
Variables
RESOURCE_GROUP: Name of your resource group containing SentinelWORKSPACE_NAME: Your Log Analytics workspace nameREGION: Azure region (e.g., "UK South")SENTINEL_SOLUTIONS: Comma-separated list of solutions to deployAR_SEVERITIES: Alert rule severities to include (e.g., "High,Medium")
[Screenshot placeholder: GitHub repository secrets and variables configuration]
Understanding the Workflow
The GitHub Action workflow automatically triggers on pushes to the main branch and can also be manually executed. Let's break down the key components:
Authentication Step
yaml
- name: Login to Azure
  uses: azure/login@v2
  with:
    client-id: ${{ secrets.SENTINEL_CLIENTID }}
    tenant-id: ${{ secrets.SENTINEL_TENANTID}}
    subscription-id: ${{ secrets.SENTINEL_SUBSCRIPTIONID }}
    environment: 'AzureCloud'
    audience: api://AzureADTokenExchange
    enable-AzPSSession: true
This step uses the federated credentials we configured earlier, eliminating the need for storing sensitive client secrets.
Deployment Step
The workflow executes a PowerShell script that handles the actual Sentinel configuration:
yaml
- name: Enable Sentinel Solutions and Alert Rules
  uses: azure/powershell@v1
  with:
    inlineScript: |
      & "${{ github.workspace }}/Scripts/Set-SentinelContent.ps1" `
        -ResourceGroup '${{ vars.RESOURCE_GROUP }}' `
        -Workspace '${{ vars.WORKSPACE_NAME }}' `
        -Region '${{ vars.REGION }}' `
        -Solutions ${{ vars.SENTINEL_SOLUTIONS }} `
        -SeveritiesToInclude ${{ vars.AR_SEVERITIES }} `
        -IsGov 'false'
Repository Structure
Organise your repository with the following structure:
sentinel-as-code/
├── .github/
│   └── workflows/
│       └── deploy-sentinel.yml
├── Scripts/
│   └── Set-SentinelContent.ps1
├── Solutions/
│   ├── solution1.json
│   └── solution2.json
└── README.md
[Screenshot placeholder: Repository file structure]
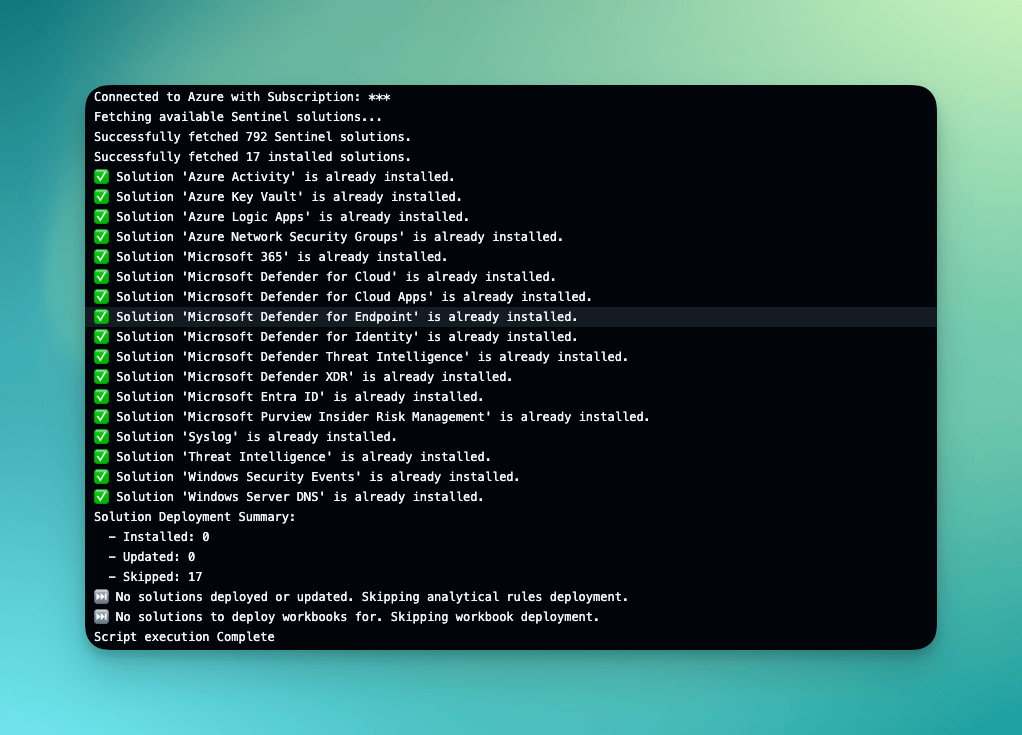
Monitoring Deployments
Once configured, every push to your main branch will trigger the deployment workflow. You can monitor progress in the Actions tab of your GitHub repository.
The workflow includes error handling with continue-on-error: true flags, ensuring that partial failures don't halt the entire deployment process.
[Screenshot placeholder: GitHub Actions workflow execution log]
Benefits of This Approach
This automated deployment strategy provides several advantages:
Consistency: Eliminates manual configuration drift between environmentsAuditability: All changes are tracked through version control Rollback capability: Easy to revert to previous configurations Collaboration: Team members can contribute through standard pull request workflows Security: No long-lived credentials stored in GitHub
Next Steps
Consider extending this workflow to include:
- Multiple environment deployments (dev/staging/production)
- Custom parsing rules and data connectors
- Automated testing of Sentinel queries
- Integration with Azure Policy for compliance checks
By implementing Sentinel-as-Code with GitHub Actions, you'll have a robust, automated deployment pipeline that scales with your security operations needs whilst maintaining the highest standards of security and governance.
Conclusion: Trialling Sentinel with Automated Deployment
If you're new to Microsoft Sentinel or considering it for your organisation, this automated deployment approach is perfect for setting up a trial environment. Once you have the basic Azure infrastructure in place—a Resource Group, Log Analytics Workspace, and Microsoft Sentinel enabled—you can quickly spin up Sentinel content within a pre-configured Sentinel environment using your chosen solutions and analytical rules types to evaluate the platform's capabilities without the overhead of manual configuration.
Create a separate resource group for your trial deployment, set up your Log Analytics Workspace and enable Microsoft Sentinel through the Azure portal, then adjust the workflow variables to point to your test environment, and you'll have a fully functional Sentinel instance ready for evaluation within minutes, all you need to do is connect the data connectors. This allows you to focus on understanding Sentinel's detection capabilities and user experience rather than spending time on initial setup and configuration.
Once you're satisfied with your trial, the same Infrastructure as Code approach seamlessly transitions to production, ensuring consistency between your test and live environments.
Next Steps
Consider extending this workflow to include:
- Multiple environment deployments (dev/staging/production)
- Custom parsing rules and data connectors
- Automated testing of Sentinel queries
- Integration with Azure Policy for compliance checks
By implementing Sentinel-as-Code with GitHub Actions, you'll have a robust, automated deployment pipeline that scales with your security operations needs whilst maintaining the highest standards of security and governance.

I hope you've found this blog helpful in enhancing DevOps experience or trialing Microsoft Sentinel. If you've enjoyed this content and would like to support more like it, please consider joining the Supporters Tier. Your support helps me continue creating practical security automation content for the community.